What is Google PageSpeed Insights?
If you’ve invested some time into making sure your site is performing well with your users, you’ve likely used the Google PageSpeed Insights tester to see how your site stacks up. This tool measures your site against a series of metrics and standards that it uses to help rank sites internet-wide. And, if you’re one of the many users of Google’s Adsense ads, this score directly affects the quality of the ads your site gets.
Unfortunately, Google PageSpeed Insights doesn’t get very verbose about why it ranked your site the way it did. And the suggestions can be hard to interpret if you’re not used to SEO and optimization terms. Not to worry, I’m here to break it down for you!
Avoid landing page redirects
This recommendation is pretty simple. It just means don’t redirect your home page to another page, either for desktop or mobile users. So for example, using a separate domain like “m.mysite.com” for mobile requests is actually less beneficial for SEO and less satisfying for users. Keep in mind with WordPress, most themes are automatically “responsive.” This means they already have built-in mobile support, without having to have an entirely separate site or domain for these users.
Also remember to check your site’s home page when testing with Google PageSpeed Insights. If your domain in the URL bar is “https://mysite.com/” then be sure to test that exact URL. Be sure you use the proper http:// or https:// version, and the correct “www” or “non-www” version.
Leverage browser caching
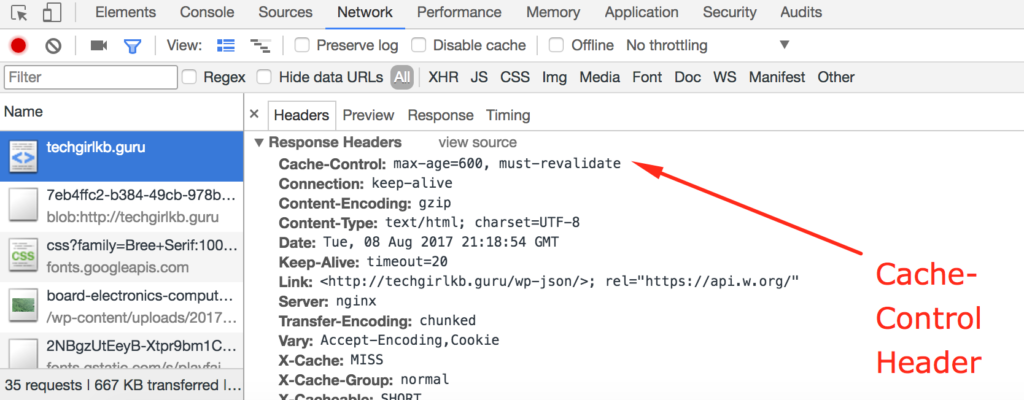
If Google PageSpeed Insights recommends this to you, be sure you check the resource it’s referencing. Is this resource called from your domain? Or is the resource called from another site? Some common examples are Google fonts, Google analytics tracking, or external API calls. If the resource is called from your own site, this means the request did not contain a header that said the web browser should cache that file or page. This means visitors to your site are having to request a new version from the server every time they visit the page. It’s best practice to include a “Cache-Control” header on the site that looks like this:

If you host with WP Engine, their platform configures page and static file caching for you automatically, so you don’t have to worry about adding these headers. Using a page caching plugin like W3 Total Cache or WP Super Cache will help you configure these headers if you don’t have a web host that configures this automatically.
When the resources showing in the details are not loading from your site’s URL, this score can be trickier to improve. However, the plugin Above the Fold Optimization has a setting that might help, called “External resource proxy” which will proxy those external resources to load from your own domain, and add the “Cache-Control” header.
Enable compression
Enabling compression is generally referring to gzip compression, which is a method of HTTP compression. For a comprehensive look at what gzip is and how it works, check out Torque’s handy guide. On WP Engine they configure this for you already at the server level. However, for other hosts you may have to either manually configure this in the .htaccess file, or use a plugin.W3 Total Cache offers “HTTP compression” which helps configure this for you in the .htaccess file. You can also use a plugin more specifically made for this task, like Check and Enable GZIP Compression.
Minify HTML, CSS, and/or Javascript
These warnings will show up if your CSS, Javascript, or HTML files referenced by your home page are not “minified.” Minification is the process of compressing and combining these files by taking out extra whitespace, comments, and formatting that might be adding to the time it takes your web browser to parse the response. The Autoptimize and BWP Minify plugins are both well-known plugins that specialize in minifying these assets on your site.
Eliminate render-blocking JavaScript and CSS in above-the-fold content
This can be one of the most confusing messages to receive when testing your site. To understand this message, you first have to understand what Above the Fold content is, and what would be considered “render blocking” JavaScript. In short, “Above the Fold” refers to what your user can see on their visible browser window (without scrolling down). It’s a legacy term that stems from the days of newspapers, where companies would have to strategically plan what would show above the literal fold of the newspaper.
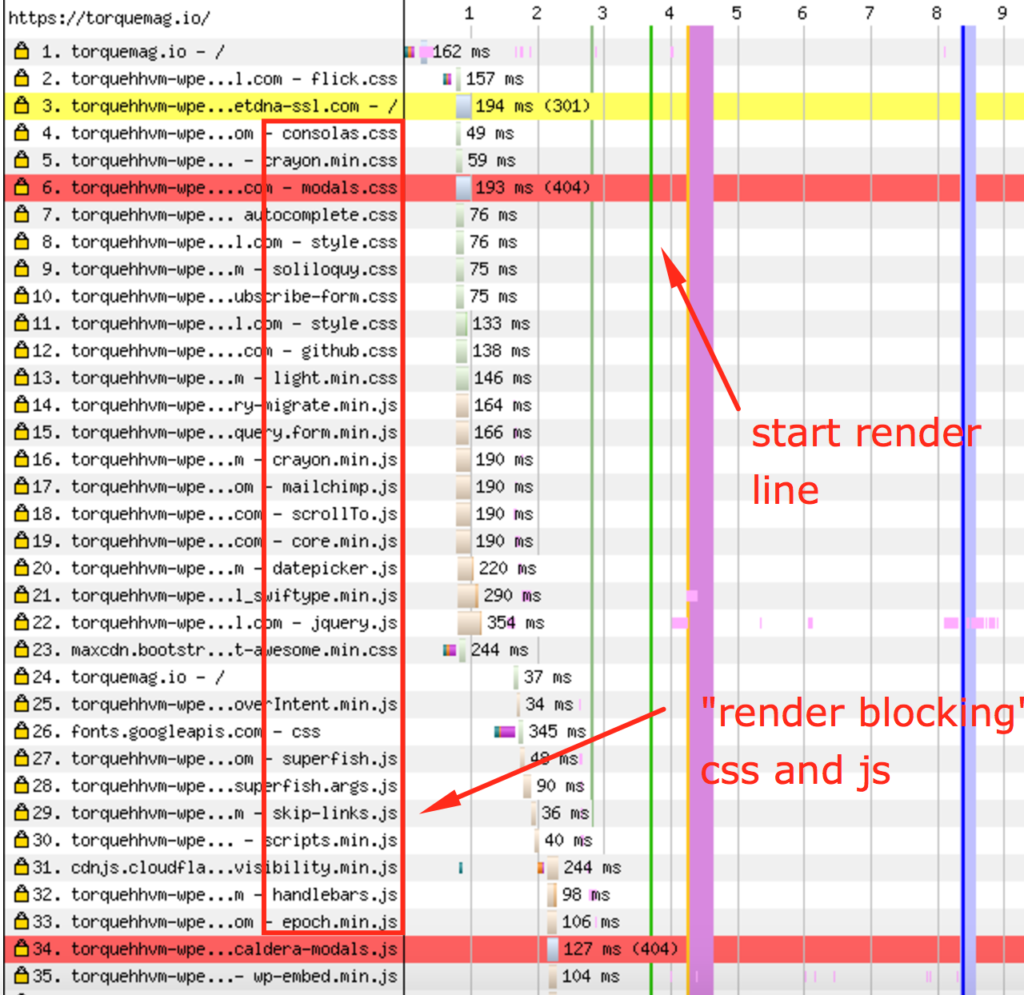
As for “render blocking,” this is referring to JavaScript and CSS files that are being required to load before the site can start showing content. Until these assets are downloaded and processed by your web browser, you’ll see a blank white page. These assets are literally blocking your users from seeing your site’s content faster! If you use a tool like WebPageTest you can get a more clear view of this in action:

So how do you fix “render blocking” assets? You can use Above the Fold Optimization for this as well. The plugin has an option to “extract full CSS,” which you can then enter into a Critical CSS extractor to find what really needs to load before the page can render. The remaining assets can be deferred to the footer using the plugin’s settings!
Prioritize visible content
This warning goes hand-in-hand with the “Above the Fold” and “Render Blocking” warnings above. It just means you should only load Above the Fold content before the page render, and nothing more. You can use a Lazy Loading plugin to help with this, or Above the Fold Optimization has a setting for this as well.
Optimize images
You’ll see this warning if your site’s images have the potential to be “losslessly” compressed. This means eliminating extra metadata associated with those images, and compressing the image size without sacrificing image quality. Two of the most popular plugins for this are WP Smush, and EWWW Image Optimizer Cloud. Usually image compression plugins will have at least a small cost to perform the optimization. If you’re not wild on the idea of optimizing your images, you can alternatively compress the images locally and re-upload them.
Reduce server response time
Google PageSpeed insights will register this warning if your “Time to First Byte” is registering at .3 seconds or higher. Time to First Byte can be a confusing metric to understand! But most often, this comes down to optimizing your site’s PHP code and queries. Check out TTFB and PHP for more information about troubleshooting TTFB.
There you have it! Some quick and easy ways to increase your Google PageSpeed scores. And along the way, we’ve covered some background on what they mean in the context of WordPress. Using these insights you can take your site’s browser performance and SEO to the next level!
Leave a Reply