• Skip to main content
  • Skip to footer

TechGirlKB

Performance | Scalability | WordPress | Linux | Insights

  • Home
  • Speaking
  • Posts
    • Linux
    • Performance
    • Optimization
    • WordPress
    • Security
    • Scalability
  • About Janna Hilferty
  • Contact Me

Ansible

How to Use AWS SSM Parameter Store with Ansible

If you’re like many frustrated Dev/Ops teams out there, you may be tired of using Ansible’s vault function to encrypt secrets, and looking for other options. AWS offers a couple options for storing secrets:

  • The more obviously-named Secrets Manager tool
  • The less-obvious Systems Manager Parameter Store

As it turns out, Ansible has lookup plugins for both AWS tools. In this guide we’ll explore both, and why (spoiler alert!) our team decided to go with Systems Manager Parameter Store in the end.

AWS Secrets Manager vs. Parameter Store

There are a few key differences between the different secure variable storage systems.

Secrets Manager

Firstly, Secrets Manager has different secret types, mostly geared toward storing, encrypting, (and regularly rotating) database credentials. Here’s a quick look at the options.

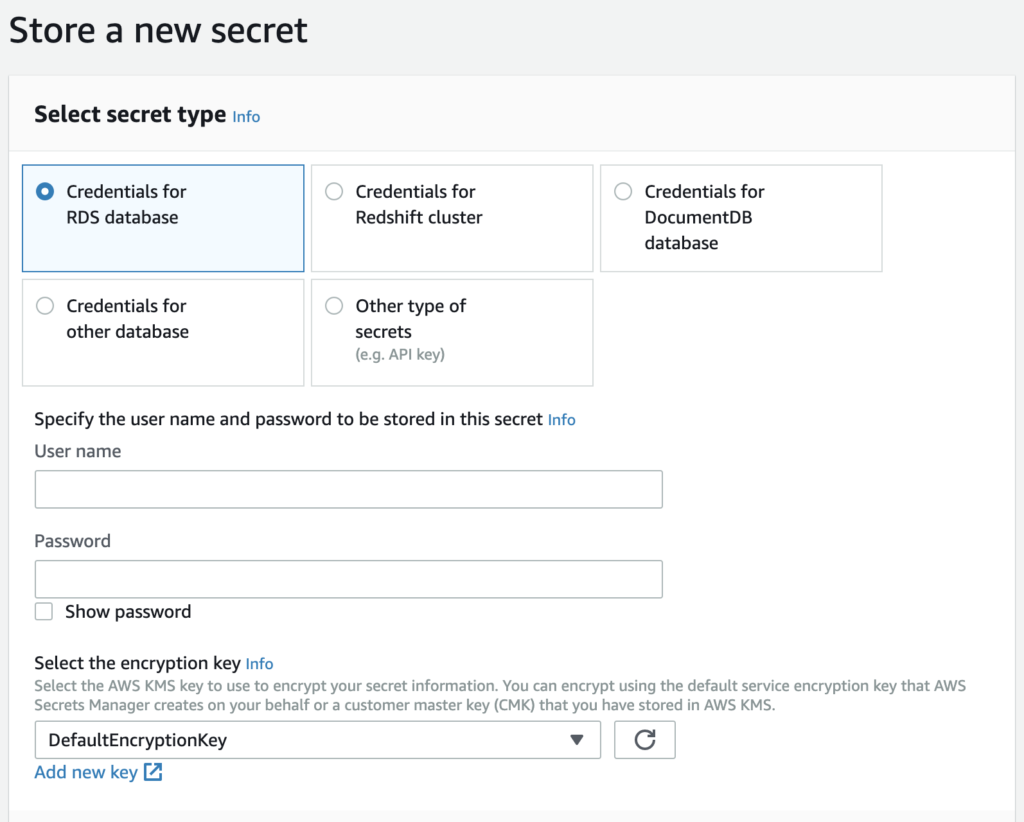
The options shown in the “Store a new secret” pane are:

  • Credentials for RDS database
  • Credentials for Redshift cluster
  • Credentials for DocumentDB database
  • Credentials for other database
  • Other type of secrets (e.g. API key)

As you can see, most of these options are specific to database credentials. There is, however, an option to store another secret in “Key” and “Value” format. This is the option our team was planning to use for most secure variables.

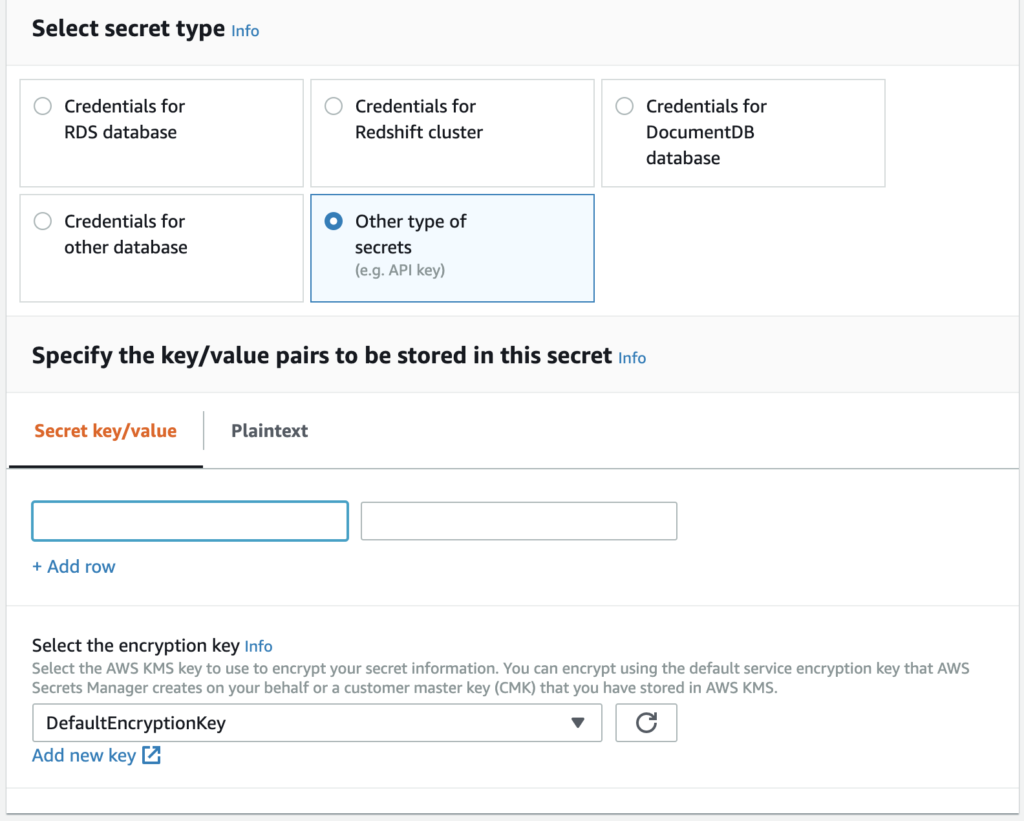
In this pane, you can add a simple key-value pair. On the next screen you can add an identifying name and any tags you wish to the key, followed by a pane where you can select automatic rotation for the key if you choose.

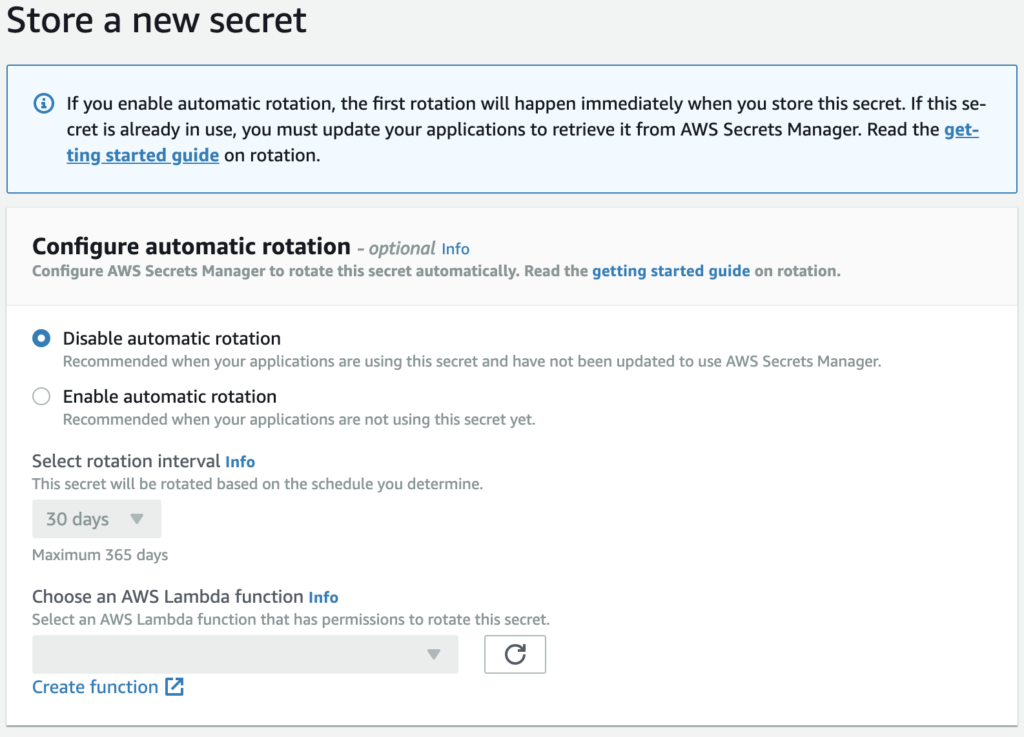
There’s a lot to like about Secrets Manager, in particular the key rotation — if you haven’t been obscuring your secure variables in your repos in the past, it allows for easy, hands-off rotation of these keys on a regular basis. This reduces risk in case of employee turnover or security breaches. And with encryption via KMS, you can limit access to whatever IAM users and roles actually need read/write access.

Secrets Manager stores secrets for $0.40/secret per month, and $0.05 per 10,000 API calls.


Systems Manager Parameter Store

By comparison, AWS Systems Manager offers a Parameter Store which is a simple key-value pair storage option. It also offers encryption via AWS KMS, which allows the same security and simplicity of permissions management. Systems Manager is used by first installing the ssm-agent on your EC2 servers. Once it is installed, it can do things like:

  • Patch Management
  • Role/Identity Association
  • Scheduled commands
  • Run commands on a subset of servers at once
  • Organize resources into Resource Groups based on Tags
  • Show compliance with Patching and Access/Permissions policies
  • Store secure, encrypted variables in Parameter Store.

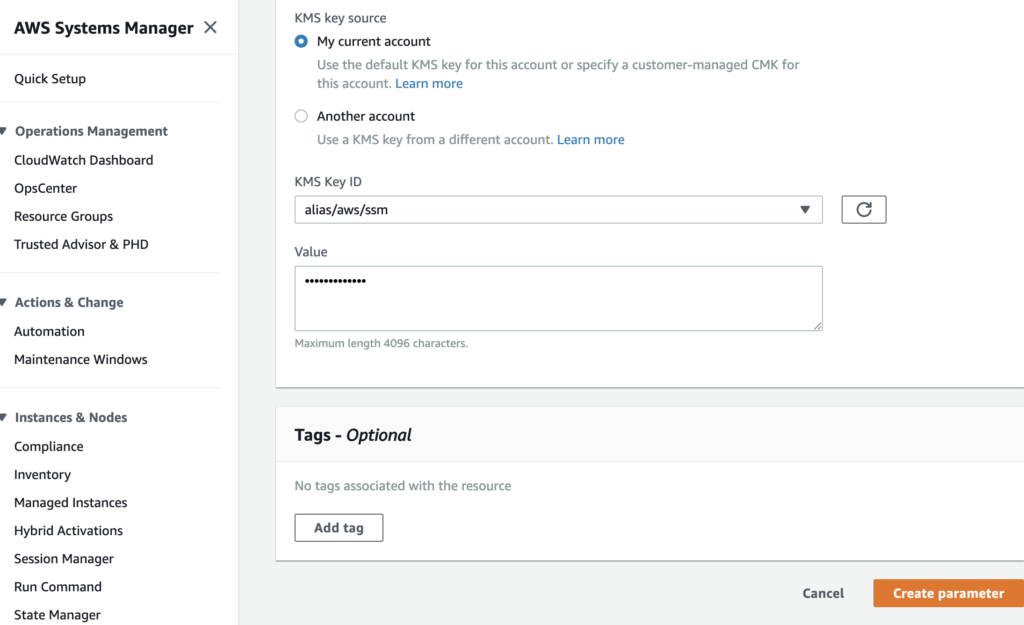
When it comes to storing parameters, the setup pane asks for a key name (which must be unique), and a value. You can store parameters as a basic String, a StringList, or a SecureString.

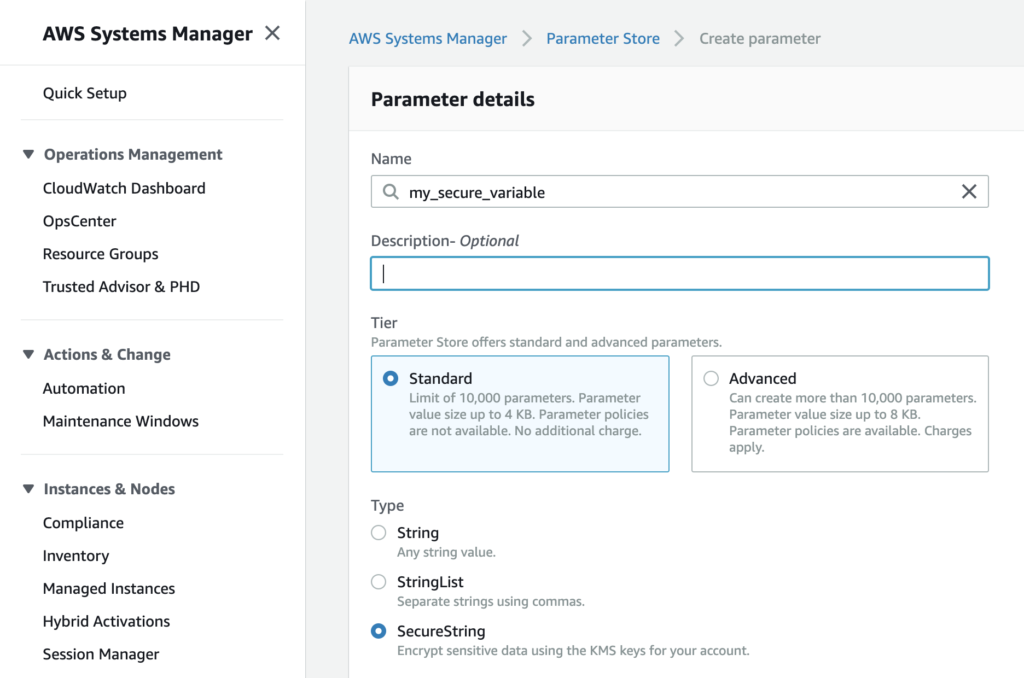
Parameter “value” strings can be up to 4096 characters to fit into the “Standard” pricing tier (free, and up to 10,000 parameters can be stored at this tier), or up to 8KB for the “Advanced” tier. “Advanced” tier secrets are priced at $0.05/advanced parameter per month.

If you choose the Advanced tier, expiration policies can be set on the parameters stored as well. Just like with Secrets Manager, additional tags can be added, and the values can be encrypted with the KMS key of your choice, making access control for your secrets more simple.


To recap, Parameter Store may offer more simplistic key-value pair storage, but is much less expensive (even at the Advanced tier). Secrets Manager offers several different storage types, most of which center around database credentials, but does offer a more simple key-value pair option too. Of the two, only Secrets Manager offers rotation, but the Advanced tier for Parameter Store does offer automatic expiration of parameters.

Ansible and Secret Management

With two options for secret management within AWS, it was difficult to know which to choose. We started with Secrets Manager, as Ansible offers both an aws_secret module, and an aws_secret lookup plugin.

aws_secret lookups

In our case, we were less interested in storing new secrets, and more interested in looking up the key and retrieving the value, for use in templates. That being the case, we chose to use the aws_secret lookup plugin. The example given in the documentation is:

- name: Create RDS instance with aws_secret lookup for password param
  rds:
    command: create
    instance_name: app-db
    db_engine: MySQL
    size: 10
    instance_type: db.m1.small
    username: dbadmin
    password: "{{ lookup('aws_secret', 'DbSecret') }}"
    tags:
      Environment: staging

Looks simple enough, right? Simply use the ‘aws_secret’ reference, and the name of the secret. Unfortunately it was not as simple for us.

Firstly, we found that adding the region to the command was necessary, like so:

"{{ lookup('aws_secret', 'my_api_key', region='us-west-1') }}"

That worked well enough in our vars_files to get through the deploy, provided the server running the ansible command had the proper IAM permissions. But, to my dismay, I found that this lookup didn’t return the “value” of the key-value pair, but rather a json string with BOTH the key and the value (shown below).

[{ 'my_api_key', 'my_api_key_value' }]

Unfortunately the only way I could get it to return just the “value” of the simple key-value style Secret was to add additional parsing in a script. So, as of now anyways, it looks like the Ansible aws_secret lookup plugin is limited to database secrets usage.


aws_ssm lookups

Enter Parameter Store. Since the Ansible aws_secret functions didn’t work as I had hoped, I tried the Systems Manager Parameter Store option instead. As with Secrets Manager, Ansible also has Parameter Store functionality in the form of the aws_ssm_parameter_store_module and the aws_ssm lookup plugin. And again, since we’re wanting to just read the value of secrets, we don’t need to mess with the module — just the lookup plugin. Ansible provides the following examples (although there are more use cases shown in the documentation):

- name: lookup ssm parameter store in the current region
  debug: msg="{{ lookup('aws_ssm', 'Hello' ) }}"

- name: lookup ssm parameter store in nominated region
  debug: msg="{{ lookup('aws_ssm', 'Hello', region='us-east-2' ) }}"

- name: lookup ssm parameter store without decrypted
  debug: msg="{{ lookup('aws_ssm', 'Hello', decrypt=False ) }}"

- name: lookup ssm parameter store in nominated aws profile
  debug: msg="{{ lookup('aws_ssm', 'Hello', aws_profile='myprofile' ) }}"

The examples given show easily enough how to use aws_ssm lookups within a playbook, but it can also be used in your vars_files like so:

environment: "{{ lookup('aws_ssm', 'env', region='us-west-2') }}"
app_name: "{{ lookup('aws_ssm', 'app_name', region='us-west-2') }}"
branch: "{{ lookup('aws_ssm', 'branch', region='us-west-2') }}"

Providing your instance is setup with the proper IAM permissions to read SSM parameters and read access to the KMS key used to encrypt them (if SecureString was selected), your variables should populate into templates without having to store them in an vaulted file or vaulting/encrypting individual strings.

Automating Parameter Addition

If your project (like ours) has a lot of vars to store, you may find it very tiresome to add all the keys one by one into the Systems Manager panel in AWS. As a DevOps engineer, it made me cringe thinking of having to add the variables by hand. So, I made a script that uses the AWS CLI to upload parameters.

A couple notes:

  • This script assumes you have an AWS CLI config file setup at ~/.aws/config, with multiple AWS account profiles. The one referenced is called “aws-main” — replace this with your own profile, or remove the line if you only have one profile.
  • The script adds a prefix of “dev_” to each variable, and a tag specifying the “Environment” as “Develop.” Tags and prefixes are not required, so feel free to tweak or replace as needed.
#!/usr/local/bin/bash -xe
declare -A vars

vars[env]=develop
vars[debug]=true
vars[key]="key_value"
#(more vars listed here...)

for i in "${!vars[@]}"
do
  aws ssm put-parameter \
  --profile "aws-main" \
  --name "dev_${i}" \
  --type "SecureString" \
  --value "${vars[$i]}" \
  --key-id "alias/dev-kms-key" \
  --tags Key=Environment,Value=Develop Key=Product,Value=Example \
  --region "us-west-2"
done

The bash script above declares an array “vars,” of which there are keys (env, debug, key) and values (develop, true, key_value). The loop uses the key as the iterator, and sets the value as the “value” in the SSM parameter.

There are still some manual steps in which I change values as needed per environment, and change tags/prefixes to reflect new environments. But this script helped cut the time to add parameters in 1/4 or more! Definitely a win in my book.

Conclusions

After some trial and error, here’s a recap of what we learned:

  • Secrets Manager is a more robust solution that offers rotation of secrets/keys. However, it is more expensive and charges for API calls.
  • If you’re looking to just populate the values of secrets for your variables in Ansible, SSM Parameter Store will work better for your needs.
  • Ansible’s aws_secret lookup works best for database Secrets.
  • Make sure you add an AWS region to your lookup
  • Shorten the time required to add Parameters using the AWS CLI and a bash loop.

Have any success or failure stories to share with either Secrets Manager or Parameter Store? Share in the comments, or contact me.

phpdbg: Increase Unit Test speed dramatically

In our current deploy setup, there exists more than 200,000 lines of code for some of our apps. Naturally, this means there are a LOT of unit tests paired with this code which need to be run, and that code coverage reports take a long time. Running the unit tests by themselves (nearly 2600 tests) took around 30 minutes to complete. However, adding in the code coverage to that run bumped the time up dramatically, to nearly 3 hours:

./vendor/bin/phpunit --coverage-clover ./tests/coverage/clover.xml
...
...
... (a lot of unit tests later)
Time: 2.88 hours, Memory: 282.50MB
OK (2581 tests, 5793 assertions)
Generating code coverage report in Clover XML format … done
Generating code coverage report in HTML format … done
Thing move a little… slowly… around here…

The dilemma

In the existing setup, our deployment service received a webhook from our source code management software every time code was merged to the develop branch. The deployment service then pushed the code change to the server, ran our ansible deployment scripts, and then ran unit tests on the actual develop server environment. This was not ideal, for a few reasons:

  1. Bad code (malicious or vulnerable code, code that breaks functionality, or code that just doesn’t work) could be pushed to the server without testing happening first.
  2. Things could be left in a broken state if the deployment were to fail its unit tests, with no real accountability to fix the issue.
  3. The unit tests take so long it was causing the deployment service to reach its 40 minute timeout just on the unit tests, not even including the code coverage.
That’s gonna be a yikes from me, hombre

In a more ideal world, the deployment to the develop server environment should be gated by the unit tests (and security scanning as well) so that code is only deployed when tests are successful. And, the most ideal way to do this would be with an automated CI/CD pipeline.

We already had some regression testing setup in Jenkins, so creating a pipeline was certainly an option. The dilemma, however, was how to generate code coverage feedback in a reasonable amount of time, without waiting 3 hours for said feedback. Enter phpdbg.

The solution

phpdbg is an alternative to xdebug, and is an interactive PHP debugger tool. Unfortunately the documentation has very little information on usage or installation, but does mention that PHP 5.6 and higher come with phpdbg included.

That information, plus a few promising blog posts (including one from Sebastian Bergmann of phpunit himself and one from remi repo’s blog) gave us hope for a faster solution:

  • http://kizu514.com/blog/phpdbg-is-much-faster-than-xdebug-for-code-coverage/
  • https://hackernoon.com/generating-code-coverage-with-phpunite-and-phpdbg-4d20347ffb45
  • https://medium.com/@nicocabot/speed-up-phpunit-code-coverage-analysis-4e35345b3dad
  • https://blog.remirepo.net/post/2015/11/09/PHPUnit-code-coverage-benchmark
  • https://thephp.cc/news/2015/08/phpunit-4-8-code-coverage-support

If this tool worked as promised, it could save a massive amount of processing time for very similar code coverage calculation results, and a little bit more Memory. Relatively small trade-offs for some big benefits, if you ask me.

Making the solution work

As it turns out, the silver bullet was more like a “bang your head on your desk until it works” kind of solution. What I read was promising, but I kept running into issues in execution.

  • First, since our Jenkins instance had PHP 7.2 installed, it sounded like phpdbg should work right out of the box since it’s included in PHP from version 5.6+, right? Unfortunately, phpdbg wasn’t an available bin to be used, and wasn’t one of the packages installed with yum on our CentOS 7 servers.
  • This github (now archived) from user krakjoe indicated if I just installed PHP from source using this repo it would work, but this too failed (and caused all other PHP functions to stop working).
  • Eventually I stumbled upon these remi rpms that actually include phpdbg. The fun didn’t stop there, though…
  • Firstly, installing the yum package worked well enough, but it took me a minute to realize that the bin is actually under “php72-phpdbg” and not just “phpdbg”. No big deal, so far…
  • Now I actually had the php72-phpdbg command working and could enter the command line, but when I wrapped the phpunit commands with it, I was getting errors about other php packages (intl, pecl-zip, etc) not being installed. It turns out the php72-phpdbg package was from the “remi-safe” repo, which didn’t recognize the other php packages (which had been installed with the remi-php72 repo). To fix this, I had to install all the remi-php72 packages with the remi-safe repo instead.
Just shake it off, buddy

At the end of the day when the dust settled, we got the results we were hoping for:

php72-phpdbg -qrr ./vendor/bin/phpunit --coverage-clover ./tests/coverage/clover.xml 
...
...
... (a lot of unit tests later)
Time: 36.37 minutes, Memory: 474.50MB
OK (2581 tests, 5793 assertions)
Generating code coverage report in Clover XML format … done
Generating code coverage report in HTML format … done

Our coverage generator showed results were about half a percent difference lower than with phpunit alone (using Xdebug). Some users have reported coverage differences more than this, or are more concerned about the differences. For us, the difference is not in our favor (lower than original results), so we are less concerned. The benefits far outweigh the concern in our situation.

Conclusion

There was a steep curve in figuring out how to install and properly use phpdbg on our servers, but in the end, saving over 2 hours per run and allowing ourselves to gate deploys to the develop server environment based on quality and security in this way made the effort totally worth it. The biggest struggle in this process was the lack of documentation out there on phpdbg, so hopefully this article helps others who may be in the same boat!

smell ya later homies!

Adding version control to an existing application

Most of us begin working on projects, websites, or applications that are already version controlled in one way or another. If you encounter one that’s not, it’s fairly easy to start from exactly where you are at the moment by starting your git repository from that point. Recently, however, I ran into an application which was only halfway version controlled. By that I mean, the actual application code was version controlled, but it was deployed from ansible code hosted on a server that was NOT version controlled. This made the deploy process frustrating for a number of reasons.

  • If your deploy fails, is it the application code or the ansible code? If the latter, is it because something changed? If so, what? It’s nearly impossible to tell without version control.
  • Not only did this application use ansible to deploy, it also used capistrano within the ansible roles.
  • While the application itself had its own AMI that could be replicated across blue-green deployments in AWS, the source server performing the deploy did not — meaning a server outage could mean a devastating loss.
  • Much of the ansible (and capistrano) code had not been touched or updated in roughly 4 years.
  • To top it off, this app is a Ruby on Rails application, and Ruby was installed with rbenv instead of rvm, allowing multiple versions of ruby to be installed.
  • It’s on a separate AWS account from everything else, adding the fun mystery of figuring out which services it’s actually using, and which are just there because someone tried something and gave up.

As you might imagine, after two separate incidents of late nights trying to follow the demented rabbit trail of deployment issues in this app, I had enough. I was literally Lucille Bluth yelling at this disaster of an app.

It was a hot mess.

Do you ever just get this uncontrollable urge to take vengeance for the time you’ve lost just sorting through an unrelenting swamp of misery caused by NO ONE VERSION-CONTROLLING THIS THING FROM THE BEGINNING? Well, I did. So, below, read how I sorted this thing out.

Start with the basics

First of all, we created a repository for the ansible/deployment code and put the existing code on this server in place. Well, kind of. It turns out there were some keys and other secure things that shouldn’t be just checked into a git repo willy-nilly, so we had to do some strategic editing.

Then I did some mental white-boarding, planning out how to go about this metamorphosis. I knew the new version of this app’s deployment code would need a few things:

  • Version control (obviously)
  • Filter out which secure items were actually needed (there were definitely some superfluous ones), and encrypt them using ansible-vault.
  • Eliminate the need for a bastion/deployment server altogether — AWS CodeDeploy, Bitbucket Pipelines, or other deployment tools can accomplish blue-green deployments without needing an entirely separate server for it.
  • Upgrade the CentOS version in use (up to 7 from 6.5)
  • Filter out unnecessary work-arounds hacked into ansible over the years (ANSIBLE WHAT DID THEY DO TO YOU!? :sob:)
  • Fix the janky way Passenger was installed and switch it from httpd/apache as its base over to Nginx
  • A vagrant/local version of this app — I honestly don’t know how they developed this app without this the whole time, but here we are.

So clearly I had my work cut out for me. But if you know me, you also know I will stop at nothing to fix a thing that has done me wrong enough times. I dove in.

Creating a vagrant

Since I knew what operating system and version I was going to build, I started with my basic ansible + vagrant template. I had it pull the regular “centos/7” box as our starting point. To start I was given a layout like this to work with:

+ app_dev
- deploy_script.sh
- deploy_script_old.sh
- bak_deploy_script_old_KEEP.sh
- playbook.yml
- playbook2.yml
- playbook3.yml
- adhoc_deploy_script.sh
+ group_vars
- localhost
- localhost_bak
- localhost_old
- localhost_template
+ roles
+ role1
+ tasks
- main.yml
+ templates
- application.yml
- database.yml
- role2
+ tasks
- main.yml
+ templates
- application.yml
- database.yml
- role3
+ tasks
- main.yml
+ templates
- application.yml
- database.yml

There were several versions of old vars files and scripts leftover from the years of non-version-control, and inside the group_vars folder there were sensitive keys that should not be checked into the git repo in plain text. Additionally, the “templates” seemed to exist in different forms in every role, even though only one role used it.

I re-arranged the structure and filtered out some old versions of things to start:

+ app_dev
- README.md
- Vagrantfile
+ provisioning
- web_playbook.yml
- database_playbook.yml
- host.vagrant
+ group_vars
+ local
- local
+ develop
- local
+ staging
- staging
+ production
- production
+ vaulted_vars
- local
- develop
- staging
- production
+ roles
+ role1
+ tasks
- main.yml
+ templates
- application.yml
- database.yml
- role2
+ tasks
- main.yml
- role3
+ tasks
- main.yml
+ scripts
- deploy_script.sh
- vagrant_deploy.sh

Inside the playbooks I lined out the roles in the order they seemed to be run from the deploy_script.sh, so they could be utilized by ansible in the vagrant build process. From there, it was a lot of vagrant up, finding out where it failed this time, and finding a better way to run the tasks (if they were even needed, as often times they were not).

Perhaps the hardest part was figuring out the capistrano deploy part of the deploy process. If you’re not familiar, capistrano is a deployment tool for Ruby, which allows you to remotely deploy to servers. It also does some things like keeping old versions of releases, syncing assets, and migrating the database. For a command as simple as bundle exec cap production deploy (yes, every environment was production to this app, sigh), there was a lot of moving parts to figure out. In the end I got it working by setting a separate “production.rb” file for the cap deploy to use, specifically for vagrant, which allows it to deploy to itself.

# 192.168.67.4 is the vagrant webserver IP I setup in Vagrant
role :app, %w{192.168.67.4}
role :primary, %w{192.168.67.4}
set :branch, 'develop'
set :rails_env, 'production'
server '192.168.67.4', user: 'vagrant', roles: %w{app primary}
set :ssh_options, {:forward_agent => true, keys: ['/path/to/vagrant/ssh/key']}

The trick here is allowing the capistrano deploy to ssh to itself — so make sure your vagrant private key is specified to allow this.

Deploying on AWS

To deploy on AWS, I needed to create an AMI, or image from which new servers could be duplicated in the future. I started with a fairly clean CentOS 7 AMI I created a week or so earlier, and went from there. I used ansible-pull to checkout the correct git repository and branch for the newly-created ansible app code, then used ansible-playbook to work through the app deployment sequence on an actual AWS server. In the original app deploy code I brought down, there were some playbooks that could only be run on AWS (requiring data from the ansible ec2_metadata_facts module to run), so this step also involved troubleshooting issues with these pieces that did not run on local.

After several prototype servers, I determined that the AMI should contain the base packages needed to install Ruby and Passenger (with Nginx), as well as rbenv and ruby itself installed into the correct paths. Then the deploy itself will install any additional packages added to the Gemfile and run the bundle exec cap production deploy, as well as swapping new servers into the ELB (elastic load balancer) on AWS once deemed “healthy.”

This troubleshooting process also required me to copy over the database(s) in use by the old account (turns out this is possible with the “Share” option for RDS snapshots from AWS, so that was blissfully easy), create a new Redis instance, copy over all the s3 assets to a bucket in the new account, and create a Cloudfront instance to serve those assets, with the appropriate security groups to lock all these services down. Last, I updated the vaulted variables in ansible to the new AMIs, RDS instances, Redis instances, and Cloudfront/S3 instances to match the new ones. After verifying things still worked as they should, I saved the AMI for easily-replicable future use.

Still to come

A lot of progress has been made on this app, but there’s more still to come. After thorough testing, we’ll need to switch over the DNS to the new ELB CNAME and run entirely from the new account. And there is pipeline work in the future too — whereas before this app was serving as its own “blue-green” deployment using a “bastion” server of sorts, we’ll now be deploying with AWS CodeDeploy to accomplish the same thing. I’ll be keeping the blog updated as we go. Until then, I can rest easy knowing this app isn’t quite the hot mess I started with.

Footer

Categories

  • Ansible
  • AWS
  • Git
  • Linux
  • Optimization
  • Performance
  • PHP
  • Scalability
  • Security
  • Uncategorized
  • WordPress

Copyright © 2023 · Atmosphere Pro on Genesis Framework · WordPress · Log in