• Skip to main content
  • Skip to footer

TechGirlKB

Performance | Scalability | WordPress | Linux | Insights

  • Home
  • Speaking
  • Posts
    • Linux
    • Performance
    • Optimization
    • WordPress
    • Security
    • Scalability
  • About Janna Hilferty
  • Contact Me

WordPress

Rewriting history — git history, that is

If you’ve ever worked with a team of contractors in software development, you may notice some of their (or even your!) commits are made under the incorrect email address or username. If you need to clean things up for compliance or maybe just your own sanity, turns out there’s a fairly easy way to rewrite any of those invalid authors’ bad commits.

Gather your list(s)

Start by checking out all branches of your repository on your local machine — we’ll need to scan them for invalid authors. Here’s a nifty shell script from user octasimo on github that does just that:

#!/bin/bash

for branch in `git branch -a | grep remotes | grep -v HEAD | grep -v master `; do

git branch --track ${branch#remotes/origin/} $branch

done

Once all branches are checked out, we’ll need to scan them for invalid authors. Use this command to get a list of those emails:

git log --all --format='%cE' | sort -u

Now you can sort that list to show only the invalid ones. For example, if my corporate company email is “@company.com” I can use grep to sort out the bad ones like so:

git log --all --format='%cE' | sort -u | grep -v '@company.com'

Now you have a list of all the invalid emails that have been used to commit changes to your repository. From there, make a list determining which proper (corporate) email should have been used.

Pipe the list into the script

For the rewriting of these emails, you can use the script provided by Github themselves. This script asks you for an “old email” (the list of bad emails we found above) and a “correct email” — the email that should have been used to make the commit.

#!/bin/sh

git filter-branch --env-filter '
OLD_EMAIL="[email protected]"
CORRECT_NAME="Your Correct Name"
CORRECT_EMAIL="[email protected]"

if [ "$GIT_COMMITTER_EMAIL" = "$OLD_EMAIL" ]
then
export GIT_COMMITTER_NAME="$CORRECT_NAME"
export GIT_COMMITTER_EMAIL="$CORRECT_EMAIL"
fi
if [ "$GIT_AUTHOR_EMAIL" = "$OLD_EMAIL" ]
then
export GIT_AUTHOR_NAME="$CORRECT_NAME"
export GIT_AUTHOR_EMAIL="$CORRECT_EMAIL"
fi
' --tag-name-filter cat -- --branches --tags

To use this script, just insert the invalid email as the value of the “OLD_EMAIL” variable, the correct name for this user as the value for the “CORRECT_NAME” variable, and the corporate email as the value for the “CORRECT_EMAIL” variable.

Quick tip: if you have to rewrite multiple emails as I did, you will want to change that first line to git filter-branch -f

Once you’ve run the script for each email that needs to be rewritten, push your changes to the repository with git, and all should be cleaned up!
Send email with Amazon SES on Google Cloud Hosting

The Google Cloud email dilemma

If you host your WordPress website on Google Cloud infrastructure, you’ve probably noticed you can’t send outgoing email through standard email ports on your server. Google allows only Google Apps to send email through ports 465 and 587, and prohibits any service from sending mail through port 25.

Many email providers have created better ways of sending or relaying email through alternate ports or APIs. But Microsoft Office 365 among others are left in the lurch when it comes to sending outgoing emails through Google Cloud servers. If you’re one of the many affected by this issue, this guide will help you configure email through Amazon Simple Email Service (SES) to send outgoing emails from your WordPress site. Many thanks to my friend Jay Hill for contributing these steps!

Set up SES DNS records

The first step is to validate your domain with the SES service–This requires adding DNS records with your DNS provider. The process is the same with any DNS provider, but we are using CloudFlare’s DNS dashboard in this example.

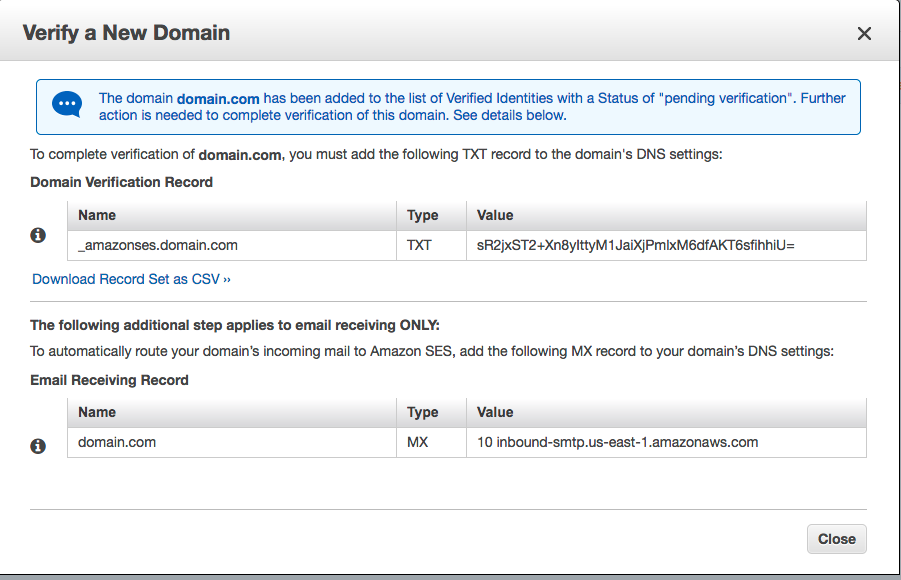
Log in to the Amazon Web Services console and navigate to the SES page. Then click “Domains” from the left-hand navigation menu. Click “Verify a new domain” and enter your domain name. If you want to utilize DKIM then you can also generate DKIM signatures in this step. On the next screen you’ll be given your DNS records to set up within your DNS provider.

You can take the Type and Value fields from these records and paste them directly into your DNS provider’s dashboard. In our CloudFlare example simply log in, choose your domain name, and select “DNS records.” In the dropdown menu to select a type of record, choose “TXT” – then in “Value” enter the “Name” field from the Domain Verification Record, and in the box next to it, enter the “Value” field. Once Amazon SES has been able to detect the records have been added, your domain is verified for use with their service.

If you utilize an email provider for your domain’s emails such as Google Suite, Outlook365, or another email server then you do not need to input the MX record and will leave your current MX records as is–this means only your outgoing emails will be handled by Amazon SES.

Create an SMTP user

Now that Amazon has been able to verify our domain for sending email we need to create an SMTP user for our WordPress site to use for sending email. On the SES console home page, click “SMTP Settings” from the left-hand navigation. Then click the “Create My SMTP Credentials” button. Leave the default username as-is and click “Create.”

On the next screen be sure to download your login credentials–we will need them in the next step. To do this, just click “Show User SMTP Security Credentials” and you can copy and paste them into your text editor of choice.

Install and configure SMTP plugin

Now that we’ve configured Amazon SES it’s time to configure your WordPress install to utilize the service. We’re going to be using the Easy WP SMTP plugin for this step. You can install this plugin by going to your plugins page in the WordPress Admin Dashboard of your site and going to Plugins > Add New > search for Easy WP SMTP > Install. Once installed you’ll want to activate the plugin so  we can configure it.

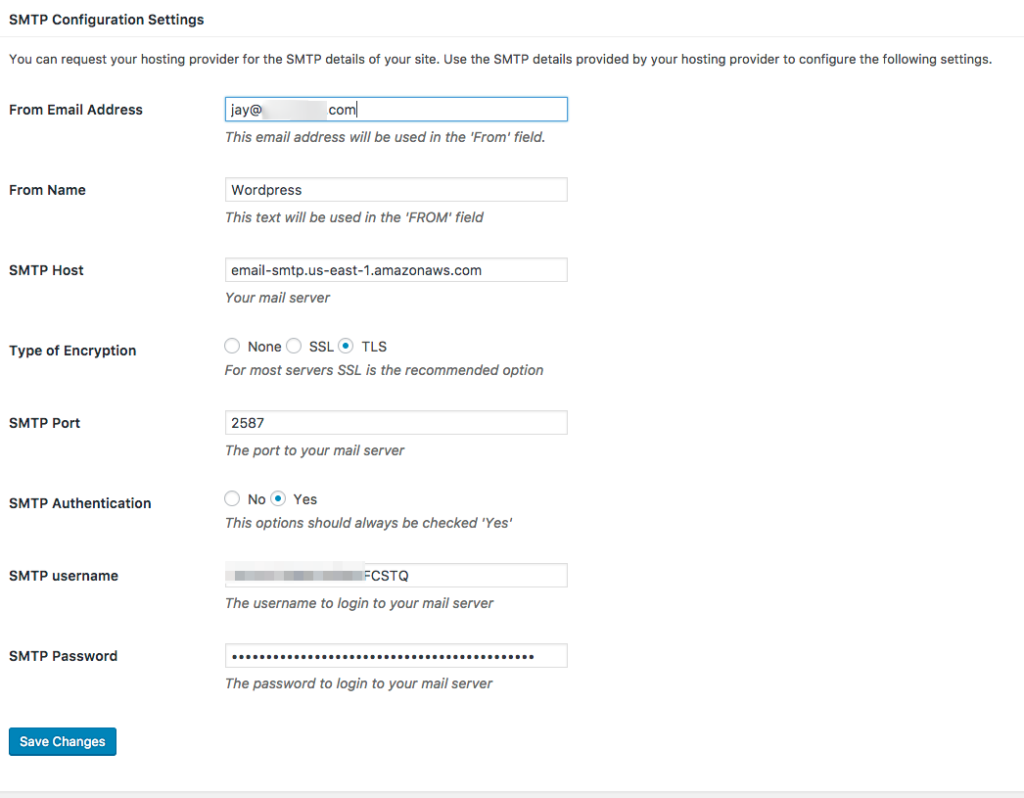
Google Cloud servers have ports 25, 465, and 587 disabled by default, but you can still use port 2587.

  • In the “From” field, put an email address you want WordPress to send email from. This could be anything as long as it has your domain name in it.
  • For the “Name” you can put anything you want your emails to show as from.
  • You can get your SMTP Host at the Amazon SES SMTP Settings page. If you setup SES in the US-East-1 region it will be: email-smtp.us-east-1.amazonaws.com.
  • Ensure that TLS is selected for the Type of Encryption setting.
  • For the sending port, input 2587.
  • Check the SMTP Authentication to yes and input your SMTP username and password that was created in the previous step.

Your settings should then look similar to this:


Send a test email

Now that your settings are configured, you’ll want to send a test email to make sure it’s working right. Right now your SES account is still in Sandbox mode, so we need to configure an email address to send email to first. In your Amazon SES console, click “Email Addresses.”

Click “Verify A New Email address,” enter in the email address you want to verify. Then click the “Verify This Email Address.” This will send an email to the specified email address. You’ll need to click the link within it to verify your email address. If you do not verify your email address, Amazon won’t send the email.

Once verified, head to the Easy WP SMTP Settings page in your dashboard and scroll down to the “Testing and Debugging Settings” section. Input the verified email address, a subject and message, and then send. Check your email to ensure that it was delivered. If it was not delivered, confirm your email address is validated and your port settings.

Request Amazon release Sandbox Mode

Amazon keeps your SES service in what is called Sandbox Mode which requires that all email addresses you send to be verified before email deliverability can be achieved. We need to request Amazon enable production access to SES by utilizing their support system for a Service Limit Increase.

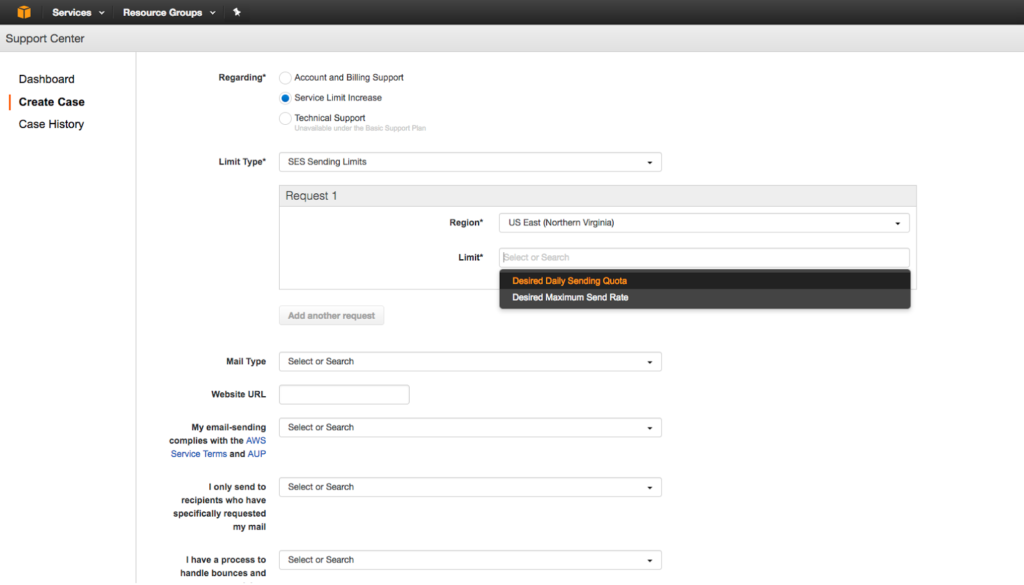
Ensure “Service Limit Increase” is selected, and “Limit Type” is set for “SES Sending Limits.” In “Request 1” choose the region you setup SES for and then choose “SES Production Access.” Fill out the rest of the boxes and submit the request. Amazon typically takes 24 hours to grant access to Production Mode for SES.

Once they have taken SES out of Sandbox mode you should be able to test your site’s emails to ensure they’re delivering properly. Be sure to test any eCommerce emails, contact forms, or transactional emails. You should also ensure that your contact forms have a captcha configured. This ensures spammers are not able to abuse your forms, which in turn abuses your SES service.


And that’s it! You’ve successfully configured Amazon SES to send your outgoing emails from WordPress. Have any additional thoughts to add, concerns, comments? Add a comment, or Contact Me.

How to download your images held hostage by Photobucket

Why download your Photobucket images?

Earlier this year, Photobucket changed their Terms and Conditions fairly silently, to prevent linking of images on their service on 3rd party websites for free. Instead, users who had posted Photobucket links to their images on another website saw this ugly prompt to upgrade their account.

Photobucket had already done this for users when they reached a very high bandwidth usage, but previously an upgrade was only $25. Now the ability to hotlink your images from Photobucket comes with a steep $400/year price tag. Many users called it extortion and blackmail. Especially because users soon discovered the interface to download their images to then post them from their own website was broken. And, the option to upload an image in a support ticket with Photobucket was broken too. This left many users in a panic. There simply was no way to get their site working again.

Luckily, if you’re familiar with Terminal and Bash, there’s a pretty easy way to get your images back. Philip Jewell posted helpful steps on Github as well as images to help guide the way.

Get the Image Links

First, log into your Photobucket account and select the album of images you need (this process goes one album at a time). Choose an image or two in the album and a “Select all” box appears. Choose “Select all” and wait for your count of images in the bottom to update before continuing. Now navigate to the next album you’d like to download and repeat the process. Do this for all albums you need to download. Through this process your total images selected should continue to grow. When you’re finished, click “Link” at the bottom of your screen.

Photobucket will open a window containing all the direct links for your images in it. Clicking will copy the links to your clipboard.

From here, create a folder on your desktop called “photobucket.” Then open a text editor on your computer and paste your image links into it. Save it as a TXT file (e.g. my_photobucket_files.txt) to your “photobucket” folder on your desktop.

Now you are ready to download the files.

Please note: the following instructions are for users on Mac OS X. If you are using a Windows machine, users have provided solutions in the comments of Philip Jewell’s post on Github: https://gist.github.com/philipjewell/a9e1eae2d999a2529a08c15b06deb13d

Download your images

Now the fun part: downloading your images from Photobucket. In your Terminal application, paste the following commands:

cd ~/Desktop/photobucket
cut -d\/ -f 7 photobucket_files.txt | grep "\." | while read file; do grep "${file}$" photobucket_files.txt; done | while read file; do curl -O --referer "http://s.photobucket.com/" ${file}; done
cut -d\/ -f 7 photobucket_files.txt | grep -v "\." | sort -u | while read dir; do mkdir ${dir}; cd ${dir}; grep "/${dir}/" ../photobucket_files.txt | while read file; do curl -O --referer "http://s.photobucket.com/" ${file}; done; cd -; done

What is this command doing? It’s looping through all your images to download them, and using “http://s.photobucket.com/” as a referer. This tricks Photobucket into thinking the requests are coming from itself. This allows you to easily download your images you need without dealing with their buggy and ad-ridden interface, or dealing with their upgrade messaging.

Some users have also suggested using sed to take out IMG tags as well:

sed -i 's/\[IMG]//g; s/\[\/IMG]//g' photobucket_files.txt


That’s all there is to it! Hopefully this guide has helped you download your images so they can be uploaded directly to your site, store, forum, or wherever they were needed. Have any comments, questions, or notes to add? Let me know in the comments, or Contact Me.

5 Winning WordPress Search Solutions

The Problem

If you’ve designed many WordPress sites, you may have noticed something: The default search function in WordPress… well… it sucks. It seriously does. If you’re unaware, allow me to enlighten you.

Firstly, the search by default only searches the title, content, and excerpt of default pages and posts on your site. Why does this suck? Because your users probably want to find things that are referenced in Custom Post Types. This includes WooCommerce orders, forums, and anything else you’ve separated to its own specific type of “post.”

The default WordPress search function also doesn’t intuitively understand searches in quotations (“phrase search”), or sort the results by how relevant they are to the term searched.

And, the default WordPress search uses a super ugly query. Here’s the results on my own default search when I searched for the word “tech” on my site:

As a performance expert, this query makes me cringe. These queries are very unoptimized! And they don’t scale well with highly-trafficked sites. Multiple people running searches on your site at once, especially ones with high post counts, will slow your site down to a crawl.

The Solution

So if WordPress search sucks, what is the best option for your site? I’m glad to explain. Firstly, if there’s any way for you to offload the searches to an external service, this will make your site much more “lightweight” on the server. This way, your queries can run on an external service specifically designed for sorting and searching! In this section I’ll explain some of the best options I’ve seen.

Algolia Search

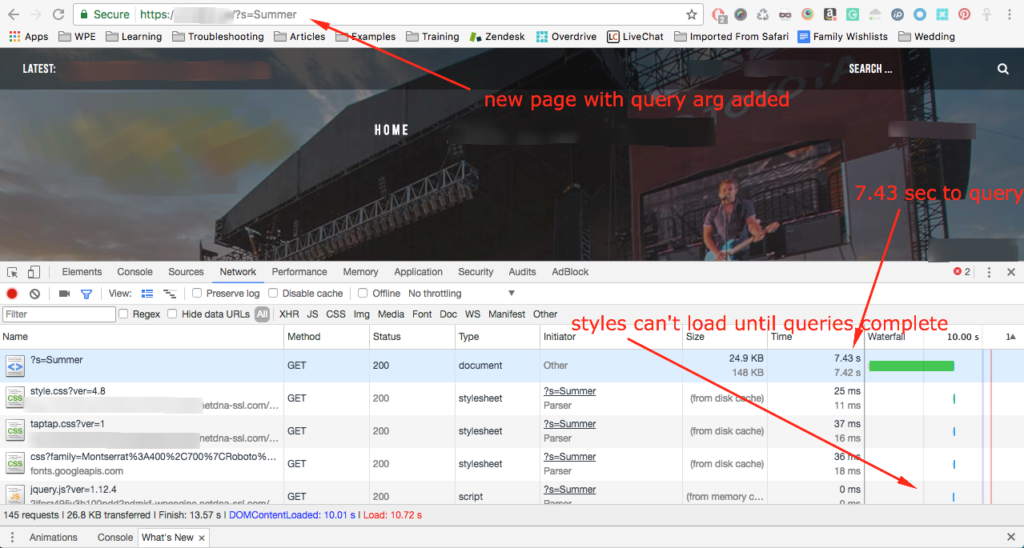
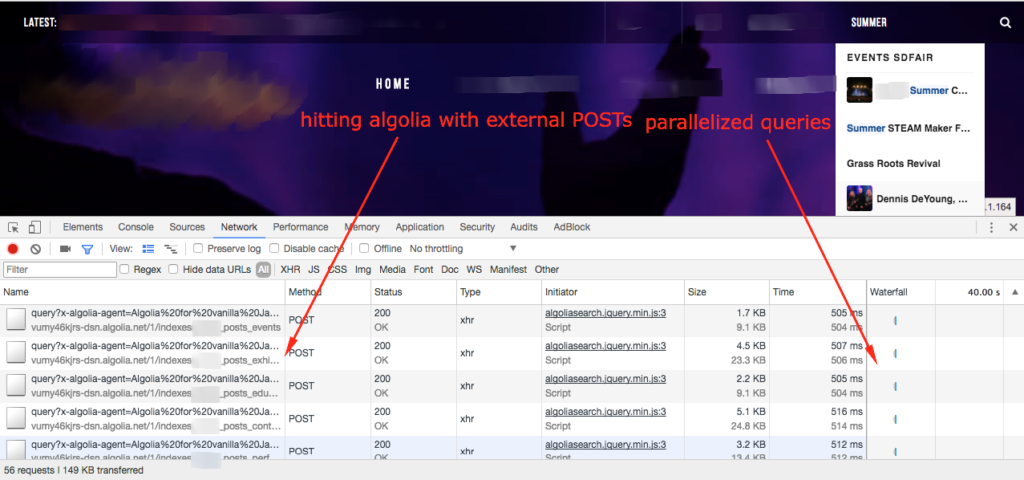
Algolia is a third party integration you can use with WordPress. With this system, your searches happen “offsite,” on Algolia’s servers. It returns your results lightning fast. Here’s a comparison of using WordPress default search, to Algolia’s external query system, on a site with thousands of events:

Default WP search:

Algolia search:

Algolia clearly takes the cake here, returning results in .5 seconds compared to nearly 8 seconds. Not only is it fast, offloading searches to external servers optimized for query performance helps reduce the amount of work your server has to do to serve your pages. This means your site will support more concurrent traffic and more concurrent searches!

Lift: Search for WordPress

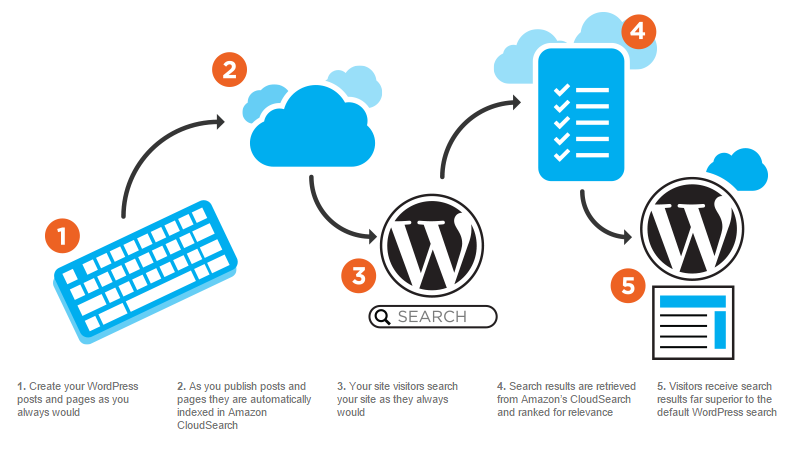
The Lift plugin offers similar benefits to Algolia in that it offers an offsite option for searching. This plugin specifically uses Amazon CloudSearch services to support your offsite searches. The major downside to this plugin is that it hasn’t been actively maintained: it hasn’t been updated in over two years. Here’s a cool diagram of how it works:

source: colorlib.com

While this plugin hasn’t been updated in quite a while, it works seamlessly with most plugins and themes, offers its own search widget, and can even search media uploads. WP Beginner has a great setup guide for help getting started.

ElasticPress

ElasticPress is a WordPress plugin which drastically improves searches by building massive indexes of your content. Not only does it integrate well with other post types, it allows for faster and more efficient searches to display related content. This plugin requires you to have ElasticSearch installed on a host. This can be the server your site resides on (if your host allows), your own computer, a separate set of servers, or using Elastic Cloud to host it on AWS using ElasticSearch’s own service. To manage your indexes, you’ll want to use WP CLI.

ElasticPress can sometimes be nebulous to set up, depending on your configuration and where ElasticSearch is actually installed. But the performance benefits are well worth the trouble. According to pressjitsu, “An orders list page that took as much as 80 seconds to load loaded in under 4 seconds” – and that’s just one example! This system can take massive, ugly search queries and crunch them in a far more performant environment geared specifically towards searching.

Other options

There are some other free, on-server options for search plugins. These plugins will offer more options for searching intuitively, but will not offer the performance benefits of the ones mentioned above.

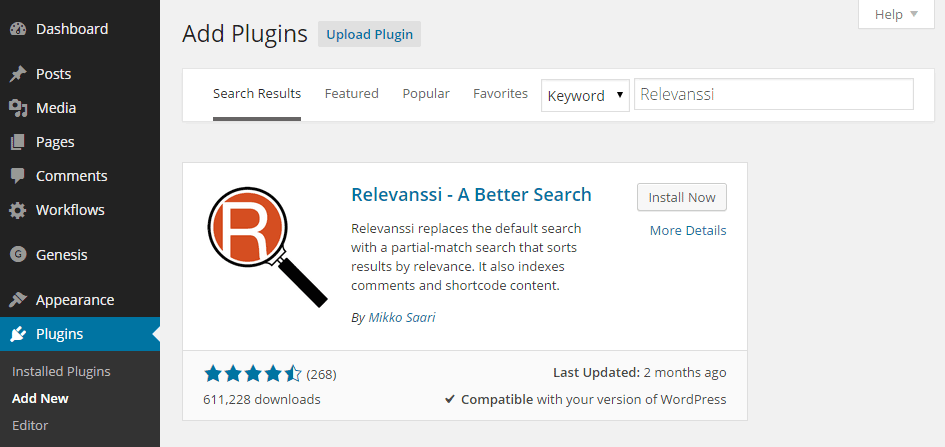
Relevanssi

Relevanssi is what some in the business call a “Freemium” plugin. The base plugin is free, but has premium upgrades that can be purchased. Out of the box, the free features include:

  • Searching with quotes for “exact phrases” – this is how many search engines (like Google) search, so this is an intuitive win for your users.
  • Indexes custom post types – a big win for searching your products or other
  • “Fuzzy search” – this means if users type part of a word, or end up searching with a typo, the search results still bring up relevant items.
  • Highlights the search term(s) in the content returned – this is a win because it shows customers why specific content came up for their search term, and helps them determine if the result is what they need.
  • Shows results based on how relevant or closely matched they are, rather than just how recently they were published.

The premium version of Relevanssi includes:

  • Multisite support
  • Assign “weight” to posts so “heavier” ones show up more or higher in results
  • Ability to import/export settings

Why I don’t recommend Relevanssi at the top of my list: it’s made to be used with 10,000 posts or less. The more posts you have, the less performant it is. This is because it still uses MySQL to search in your site’s own database, which can weigh down your site and the server it resides on. Still, it offers more options for searching than many! It is a viable option if you have low traffic and fewer than 10,000 posts.

SearchWP

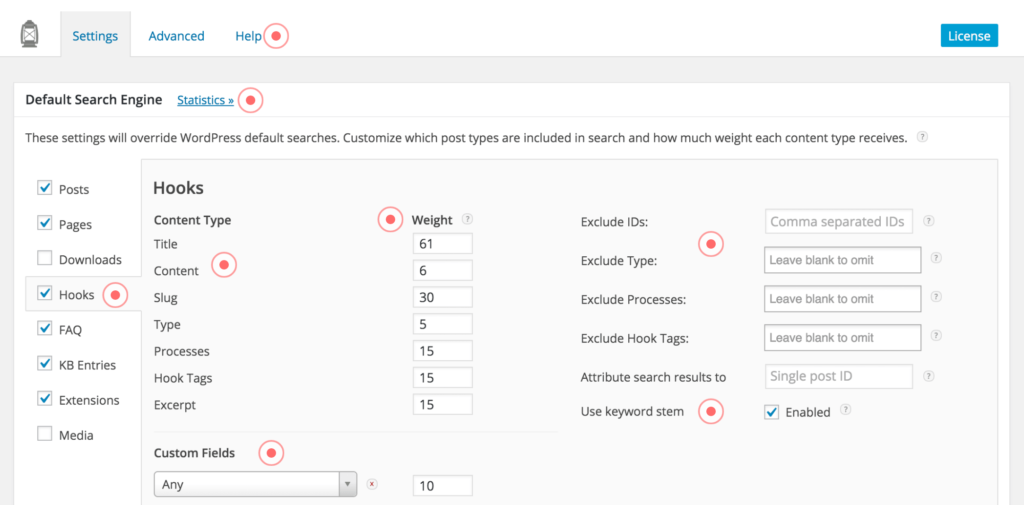
SearchWP claims to be the best search plugin out there. It certainly offers a lot of features, either way. Out of the box, it can search: PDFs, products and their description, shortcode data, terms and taxonomy data, and custom field data. That’s a pretty comprehensive list!

Above you can see some of the nice customizable settings like weight, excluding options, custom fields, and how to easily check/uncheck items to include.

However, SearchWP comes with a BIG asterisk from me. SearchWP will create giant tables in your database. Your database should be trim to perform well. You want to be sure the size of your databases fit within your Memory buffer pool for MySQL processes to ensure proper performance. Be absolutely certain you have enough server resources to support the amount of data stored by SearchWP!


These solutions are the only ones I would truly recommend for sites. There certainly are others available, but they work using AJAX which can easily overwhelm your server and slow down your site. Or, they use equally ugly queries to find the search terms.

As a rule of thumb, I absolutely recommend an offsite option specifically optimized for searches. If this simply isn’t an option, be sure to use a plugin solution that offers the range of features you need without weighing down your database too much.

Is there a search solution you like on your own site? Is there an important option I left off? Let me know in the comments, or contact me.


WordPress Doesn’t Use PHP Sessions, and Neither Should You

What are PHP Sessions?

PHP Sessions are a type of cookie, meant to store or track data about a user on your site. For instance, a shopping cart total, or recommended articles might gather this kind of data. If a site is using PHP Sessions, you’ll be able to see them by opening your Chrome Inspector. Right-click the page and choose “Inspect Element”. Then select “Application” and expand the “Cookies” section. Below is an example of a site which is using PHP Sessions:

What’s wrong with PHP Sessions?

There are a number of reasons sites should not use PHP Sessions. Firstly, let’s discuss the security implications:

  • PHP Sessions can easily be exploited by attackers. All an attacker needs to know is the Session ID Value, and they can effectively “pick up” where another user “left off”. They can obtain personal information about the user or manipulate their session.
  • PHP Sessions store Session data as temporary files on the server itself, under the /tmp directory. This is particularly insecure on shared hosting environments. Since any site would have equal access to store files in /tmp, it would be relatively easy for an attacker to write a script to read and exploit these files.

So we can see PHP Sessions are not exactly the most secure way to protect the identity of the users on the site. Not only this, but PHP Sessions also carry performance implications. By nature, since each session carries a unique identifier, each new user’s requests would effectively “bust cache” in any page caching system. This system simply won’t scale with more concurrent traffic! Page cache is integral to keeping your site up and running no matter the amount of traffic you receive. If your site relies on PHP Sessions, you’re essentially negating any benefits for those users.

So I can’t track user behavior on my site?

False! You absolutely can. There are certainly more secure ways to store session data, and ways that will work better within cache. For example, WooCommerce and other eCommerce solutions for WordPress store session data in the database using a transient session value. This takes away the security risk of the temporary files stored with $_SESSION cookies. WordPress themselves choose to track logged-in users and other sessions with cookies of other names and values. So it is definitely possible to achieve what you want using more secure cookies.

I’m already using PHP Sessions. What now?

I’d recommend searching your site’s content to ensure you don’t have any plugins that are setting a “$_SESSION” cookie. If you find one, take a step back and look critically at the plugin. Is this plugin up to date? If not, update it! Is it integral to the way your site functions? If not, delete it! And if the plugin is integral, look out for replacement plugins that offer similar functionality for your site.

If the plugin itself is irreplaceable and is up to date, your next step should be asking the plugin developer what their plan is. Why does it use $_SESSION cookies? Are they planning on switching to a more secure method soon? The harsh reality is, due to the insecure nature of PHP Sessions, many WordPress hosts don’t support them at all.

As a last resort, if your host supports it you may want to check out the Native PHP Sessions plugin from Pantheon. Be sure to check with your host if this plugin is allowed and supported in their environment!

Preventing Site Mirroring via Hotlinking

Introduction

If you’re a content manager for a site, chances are one of your worst nightmares is having another site completely mirror your own, effectively “stealing” your site’s SEO. Site mirroring is the concept of showing the exact same content and styles as another site. And unfortunately, it’s super easy for someone to do.

How is it done?

Site mirroring can be accomplished by using a combination of “static hotlinking” and some simple PHP code. Here’s an example:

Original site:

site mirroring


Mirrored site:

site mirroring


The sites look (almost) exactly the same! The developer on the mirrored site used this code to mirror the content:

<?php
//get site content
        $my_site = $_SERVER['HTTP_HOST'];
        $request_url = 'http://philipjewell.com' . $_SERVER['REQUEST_URI'];
        $ch = curl_init();
        curl_setopt($ch, CURLOPT_URL, $request_url);
        curl_setopt($ch, CURLOPT_FOLLOWLOCATION, true);
        curl_setopt($ch, CURLOPT_RETURNTRANSFER, TRUE);
        $site_content = curl_exec($ch); //get the contents of the site from this server by curling it
        //get all the href links and replace them with our domain so they don't navigate away
        $site_content = preg_replace('/href=(\'|\")https?:\/\/(www\.)?philipjewell.com/', 'href=\1https://'.$my_site, $site_content);
        $site_content = preg_replace('/Philip Jewell Designs/', 'What A Jerk Designs', $site_content);
        echo $site_content;
?>

Unfortunately it’s super simple with just tiny bits of code to mirror a site. But, luckily there are some easy ways to protect your site against this kind of issue.

Prevent Site Mirroring

There are a few key steps you can take on your site to prevent site mirroring. In this section we’ll cover several prevention method options for both Nginx and Apache web servers.

Disable hotlinking

The first and most simple is to prevent static hotlinking. This essentially means preventing other domains from referencing static files (like images) from your site on their own. If you host your site with WP Engine, simply contact support via chat to have them disable this for you. If you host elsewhere, you can use the below examples to see how to disable static hotlinking in Nginx and Apache. Both links provide more context into what each set of rules does for further information.

Nginx (goes in your Nginx config file)

location ~* \.(gif|png|jpe?g)$ {
expires 7d;
add_header Pragma public;
add_header Cache-Control "public, must-revalidate, proxy-revalidate";
# prevent hotlink
valid_referers none blocked ~.google. ~.bing. ~.yahoo. server_names ~($host);
if ($invalid_referer) {
rewrite (.*) /static/images/hotlink-denied.jpg redirect;
# drop the 'redirect' flag for redirect without URL change (internal rewrite)
}
}
# stop hotlink loop
location = /static/images/hotlink-denied.jpg { }

Apache (goes in .htaccess file)

RewriteEngine on
RewriteCond %{HTTP_REFERER} !^$
RewriteCond %{HTTP_REFERER} !^http(s)?://(www\.)?yourdomain.com [NC]
RewriteCond %{HTTP_REFERER} !^http(s)?://(www\.)?google.com [NC]
RewriteCond %{HTTP_REFERER} !^http(s)?://(www\.)?bing.com [NC]
RewriteCond %{HTTP_REFERER} !^http(s)?://(www\.)?yahoo.com [NC]
RewriteRule \.(jpg|jpeg|png|gif|svg)$ http://dropbox.com/hotlink-placeholder.jpg [NC,R,L]


Disable CORS/Strengthen HTTP access control

The above steps will help prevent others from linking to static files on your site. However, you’ll also want to either disable CORS (Cross Origin Resource Sharing), or strengthen your HTTP access control for your site.

CORS is the ability for other sites to reference links to your own site in their source code. By disabling this, you’re preventing other sites from displaying content hosted on your own site. You can be selective with CORS as well, to only allow references to your own CDN URL, or another one of your sites. Or you can disable it entirely if you prefer.

According to OWASP guidelines, CORS headers allowing everything (*) should only be present on files or pages available to the public. To restrict the sharing policy to only your site, try using these methods:

.htaccess (Apache):

Access-Control-Allow-Origin: http://www.example.com

This allows only www.example.com to access your site. You can also set this to be a wildcard value, like in this example.

Nginx config (Nginx):

add_header 'Access-Control-Allow-Origin' 'www\.example\.com';

This says to only allow requests from www.example.com. You can also be more specific with these rules, to only allow specific methods from specific domains.

Disable iframes

Another step you may want to take is disabling the ability for others to create iframes from your site. By using iframes, some users may believe content on an attacker’s site is legitimately from your site, and be misled into sharing personal information or downloading malware. Read more about X-Frame-Options on Mozilla’s developer page.

Use “SAMEORIGIN” if you wish to embed iframes on your own site, but don’t want any other sites to display content. And use “DENY” if you don’t use iframes on your own site, and don’t want anyone else to use iframes from your site.

Block IP addresses

Last, if you’ve discovered that another site is actively mirroring your own, you can also block the site’s IP address. This can be done with either Nginx or Apache. First, find the site’s IP address using the following:

dig +short baddomain.com

This will print out the IP address that the domain is resolving to. Make sure this is the IP address that shows in your site’s Nginx or Apache access logs for the mirrored site’s requests.

Next, put one of the following in place:

Apache (in .htaccess file):

Deny from 123.123.123.123

Nginx (in Nginx config):

deny 123.123.123.123;


File a DMCA Takedown Notice

Last, if someone is mirroring your site without your explicit approval or consent, you may also want to take action by filing a DMCA Takedown Notice. You can follow this DMCA guide for more information. The guide will walk you through finding the host of the domain mirroring your own site, and filing the notice with the proper group.


Thank you to Philip Jewell for collaborating on this article! And thanks for tuning in. If you have feedback, additional information about blocking mirrored sites drop a line in the comments or contact me.

  • Page 1
  • Page 2
  • Next Page »

Footer

Categories

  • Ansible
  • AWS
  • Git
  • Linux
  • Optimization
  • Performance
  • PHP
  • Scalability
  • Security
  • Uncategorized
  • WordPress

Copyright © 2023 · Atmosphere Pro on Genesis Framework · WordPress · Log in