If you use CIS (Center for Internet Security) ruleset in your security scans, you may need to create a partitioning scheme in your AMI that matches the recommended CIS rules. On AWS this becomes slightly harder if you use block storage (EBS). In this guide I’ll show how to create a partitioning scheme that complies with CIS rules.
Prerequisites:
- AWS account
- CentOS 7 operating system
CIS Partition Rules
On CentOS 7, there are several rules for partitions which both logically separate webserver-related files from things like logs, and limit execution of files (like scripts, or git clones, for example) in directories accessible by anyone (such as /tmp, /dev/shm, and /var/tmp).
The rules are as follows:
- 1.1.2 Ensure separate partition exists for /tmp
- 1.1.3 Ensure nodev option set on /tmp partition
- 1.1.4 Ensure nosuid option set on /tmp partition
- 1.1.5 Ensure noexec option set on /tmp partition
- 1.1.6 Ensure separate partition exists for /var
- 1.1.7 Ensure separate partition exists for /var/tmp
- 1.1.8 Ensure nodev option set on /var/tmp partition
- 1.1.9 Ensure nosuid option set on /var/tmp partition
- 1.1.10 Ensure noexec option set on /var/tmp
- 1.1.11 Ensure separate partition exists for /var/log
- 1.1.12 Ensure separate partition exists for /var/log/audit
- 1.1.13 Ensure separate partition exists for /home
- 1.1.14 Ensure nodev option set on /home partition
- 1.1.15 Ensure nodev option set on /dev/shm partition
- 1.1.16 Ensure nosuid option set on /dev/shm partition
- 1.1.17 Ensure noexec option set on /dev/shm partition
Below I’ll explain how to create a partition scheme that works for all the above rules.
Build your server
Start by building a server from your standard CentOS 7 AMI (Amazon Machine Image – if you don’t have one yet, there are some available on the Amazon Marketplace).
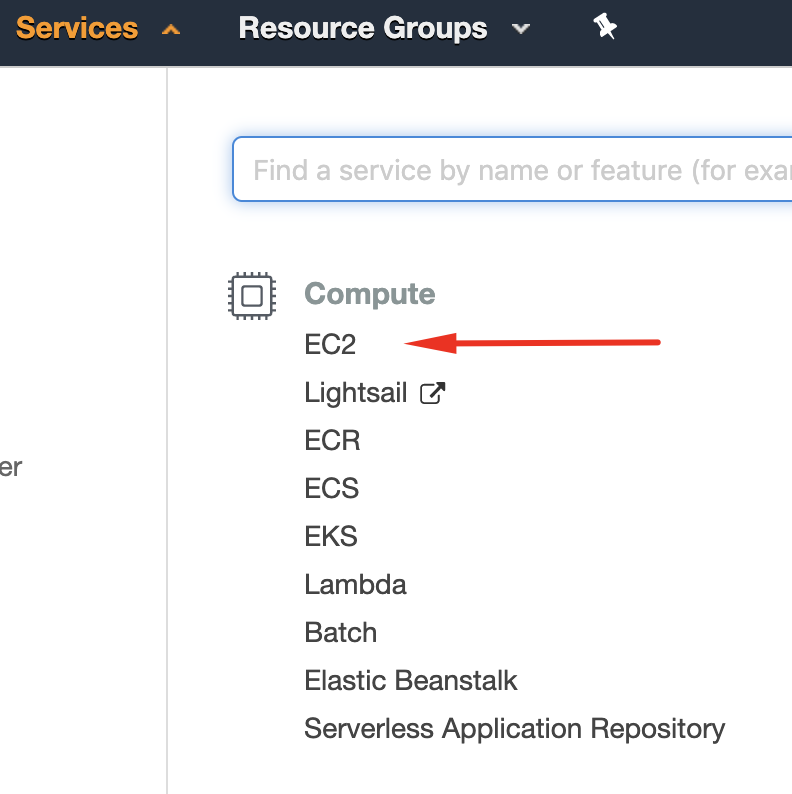
Sign in to your Amazon AWS dashboard and select EC2 from the Services menu.

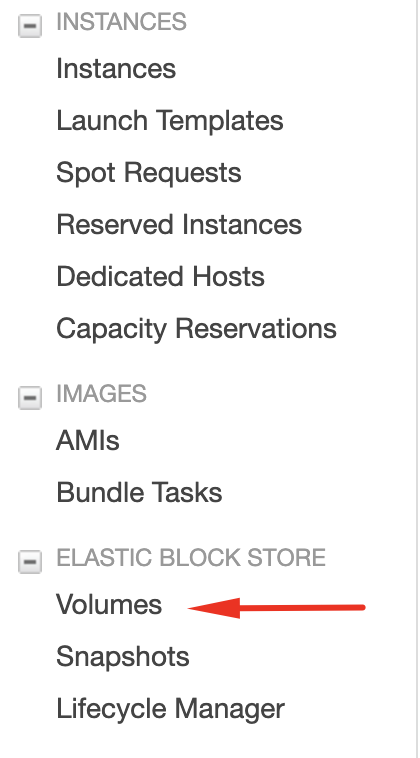
In your EC2 (Elastic Compute Cloud dashboard), select the “Launch Instance” menu and go through the steps to launch a server with your CentOS 7 AMI. For ease of use I recommend using a t2-sized instance. While your server is launching, navigate to the “Volumes” section under the Elastic Block Store section:

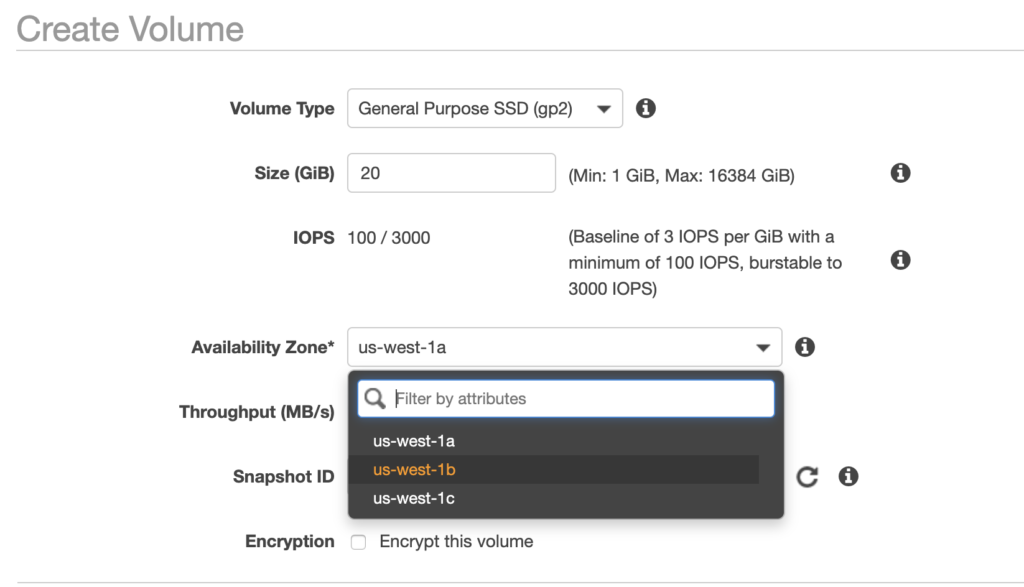
Click “Create Volume” and create a basic volume in the same Availability Zone as your server.

After the volume is created, select it in the list of EBS volumes and select “Attach volume” from the dropdown menu. Select your newly-created instance from the list, and make sure the volume is added as /dev/sdf. *

*This is important – if you were to select “/dev/sda1” instead, it would try to attach as the boot volume, and we already have one of those attached to the instance. Also note, these will not be the names of the /dev/ devices on the server itself, but we’ll get to that later.
Partitioning
Now that your server is built, login via SSH and use sudo -i to escalate to the root user. Now let’s check which storage block devices are available:
# lsblk
NAME        MAJ:MIN RM  SIZE RO TYPE MOUNTPOINT
 xvda     259:0    0   20G  0 disk
 └─xvda1 259:1    0   20G  0 part /
 xvdf     259:2    0   20G  0 disk
If you chose t2 instance sizes in AWS, you likely have devices “xvda” and “xvdf,” where “xvdf” is the volume we manually added to the instance. If you chose t3 instances you’ll likely see device names like nvme0n1 instead. These devices are listed under dev on your instance, for reference.
Now we’ll partition the volume we added using parted.
# parted /dev/xvdf
(parted) p
Model: Xen Virtual Block Device (xvd)
Disk /dev/xvdf: 18432MiB
Sector size (logical/physical): 512B/512B
Partition Table: gpt
Disk Flags:

Number  Start  End  Size  File system  Name  Flags

(parted) mklabel gpt
(parted) mkpart vartmp ext4 2MB 5%
(parted) mkpart swap linux-swap 5% 10%
(parted) mkpart home ext4 10% 15%
(parted) mkpart usr ext4 15% 45%
(parted) mkpart varlogaudit ext4 45% 55%
(parted) mkpart varlog ext4 55% 65%
(parted) mkpart var ext4 65% 100%
(parted) unit GiB
(parted) p
Model: Xen Virtual Block Device (xvd)
Disk /dev/xvdf: 18.0GiB
Sector size (logical/physical): 512B/512B
Partition Table: gpt
Disk Flags:

Number  Start    End      Size     File system     Name         Flags
  1      0.00GiB  1.00GiB  1.00GiB  ext4            vartmp
  2      1.00GiB  2.00GiB  1.00GiB  linux-swap(v1)  swap
  3      2.00GiB  4.00GiB  2.00GiB  ext4            home
  4      4.00GiB  9.00GiB  5.00GiB  ext4            usr
  5      9.00GiB  11.0GiB  2.00GiB  ext4            varlogaudit
  6      11.0GiB  12.4GiB  1.40GiB  ext4            varlog
  7      12.4GiB  20.0GiB  7.60GiB  ext4            var

(parted) align-check optimal 1
1 aligned
(parted) align-check optimal 2
2 aligned
(parted) align-check optimal 3
3 aligned
(parted) align-check optimal 4
4 aligned
(parted) align-check optimal 5
5 aligned
(parted) align-check optimal 6
6 aligned
(parted) align-check optimal 7
7 aligned
(parted) quit
Information: You may need to update /etc/fstab
Now when you run lsblk you’ll see the 7 partitions we created:
# lsblk
NAME    MAJ:MIN RM  SIZE RO TYPE MOUNTPOINT
xvda    202:0    0   20G  0 disk
└─xvda1 202:1    0   20G  0 part /
xvdf    202:80   0   18G  0 disk
├─xvdf1 202:81   0  3.6G  0 part
├─xvdf2 202:82   0  922M  0 part
├─xvdf3 202:83   0  922M  0 part
├─xvdf4 202:84   0  4.5G  0 part
├─xvdf5 202:85   0  921M  0 part
├─xvdf6 202:86   0  1.8G  0 part
└─xvdf7 202:87   0  5.4G  0 part
After you’ve run through the steps above, you’ll have created the partitions, but now we need to mount them and copy the correct directories to the proper places.
First, let’s make the partitions filesystems using mkfs. We’ll need to do this for every partition except the one for swap! Note that we’re leaving out partition ID 2 in our loop below, which was the swap partition. After creating the filesystems, we’ll use mkswap to format our swap partition. Note also that you may need to change the “xvdf” parts to match the name of your secondary filesystem if it’s not xvdf.
# for I in 1 3 4 5 6 7; do mkfs.ext4 /dev/xvdf${I}; done
# mkswap /dev/xvdf2
Next, we’ll mount each filesystem. Start by creating directories (to which we will sync files from their respective places in existing the filesystem). Again, if your filesystem is not “xvdf” please update the commands accordingly before running.
# mkdir -p /mnt/vartmp /mnt/home /mnt/usr /mnt/varlogaudit /mnt/varlog /mnt/var
# mount /dev/xvdf1 /mnt/vartmp
# mount /dev/xvdf3 /mnt/home
# mount /dev/xvdf4 /mnt/usr
# mount /dev/xvdf5 /mnt/varlogaudit
# mount /dev/xvdf6 /mnt/varlog
# mount /dev/xvdf7 /mnt/var
Now, we’ll sync the files from their existing places, to the places we’re going to be separating into different filesystems. Note, for the tricky ones that are all in the same paths (/var, /var/tmp, /var/log, and /var/log/audit), we have to exclude the separated directories from the sync and create them as empty folders with the default 755 directory permissions.
# rsync -av /var/tmp/ /mnt/vartmp/
# rsync -av /home/ /mnt/home/
# rsync -av /usr/ /mnt/usr/
# rsync -av /var/log/audit/ /mnt/varlogaudit/
# rsync -av --exclude=audit /var/log/ /mnt/varlog/
# rsync -av --exclude=log --exclude=tmp /var/ /mnt/var/
# mkdir /mnt/var/log
# mkdir /mnt/var/tmp
# mkdir /mnt/var/log/audit
# mkdir /mnt/varlog/audit
# chmod 755 /mnt/var/log
# chmod 755 /mnt/var/tmp
# chmod 755 /mnt/var/log/audit
# chmod 755 /mnt/varlog/audit
Last, to create the /tmp partition in the proper way, we need to take some additional steps:
# systemctl unmask tmp.mount
# systemctl enable tmp.mount
# vi /etc/systemd/system/local-fs.target.wants/tmp.mount
Inside the /etc/systemd/system/local-fs.target.wants/tmp.mount file, edit the /tmp mount to the following options:
[Mount]
What=tmpfs
Where=/tmp
Type=tmpfs
Options=mode=1777,strictatime,noexec,nodev,nosuid
Now that the files are in the proper mounted directories, we can edit the /etc/fstab file to tell the server where to mount the files upon reboot. To do this, first, we’ll need to get the UUIDs of the partitions we’ve created:
# blkid
/dev/xvda1: UUID="f41e390f-835b-4223-a9bb-9b45984ddf8d" TYPE="xfs" /dev/xvdf1: UUID="dbf88dd8-32b2-4cc6-aed5-aff27041b5f0" TYPE="ext4" PARTLABEL="vartmp" PARTUUID="5bf3e3a1-320d-407d-8f23-6a22e49abae4"
/dev/xvdf2: UUID="238e1e7d-f843-4dbd-b738-8898d6cbb90d" TYPE="swap" PARTLABEL="swap" PARTUUID="2facca1c-838a-4ec7-b101-e27ba1ed3240"
/dev/xvdf3: UUID="ac9d140e-0117-4e3c-b5ea-53bb384b9e3c" TYPE="ext4" PARTLABEL="home" PARTUUID="e75893d8-61b8-4a49-bd61-b03012599040"
/dev/xvdf4: UUID="a16400bd-32d4-4f90-b736-e36d0f98f5d8" TYPE="ext4" PARTLABEL="usr" PARTUUID="3083ee67-f318-4d8e-8fdf-96f7f06a0bef" /dev/xvdf5: UUID="c4415c95-8cd2-4f1e-b404-8eac4652d865" TYPE="ext4" PARTLABEL="varlogaudit" PARTUUID="37ed0fd9-8586-4e7b-b42e-397fcbf0a05c"
/dev/xvdf6: UUID="a29905e6-2311-4038-b6fa-d1a8d4eea8e9" TYPE="ext4" PARTLABEL="varlog" PARTUUID="762e310e-c849-48f4-9cab-a534f2fad590"
/dev/xvdf7: UUID="ac026296-4ad9-4632-8319-6406b20f02cd" TYPE="ext4" PARTLABEL="var" PARTUUID="201df56e-daaa-4d0d-a79e-daf30c3bb114"
In your /etc/fstab file, enter (something like) the following, replacing the UUIDs in this example with the ones in your blkid output. Be sure to scroll all the way over to see the full contents of the snippet below!
#
# /etc/fstab
# Created by anaconda on Mon Jan 28 20:51:49 2019
#
# Accessible filesystems, by reference, are maintained under '/dev/disk'
# See man pages fstab(5), findfs(8), mount(8) and/or blkid(8) for more info
#

UUID=f41e390f-835b-4223-a9bb-9b45984ddf8d /                       xfs     defaults        0 0
UUID=ac9d140e-0117-4e3c-b5ea-53bb384b9e3c /home                   ext4    defaults,noatime,acl,user_xattr,nodev,nosuid    0 2
UUID=a16400bd-32d4-4f90-b736-e36d0f98f5d8 /usr                    ext4    defaults,noatime,nodev,errors=remount-ro        0 2
UUID=c4415c95-8cd2-4f1e-b404-8eac4652d865 /var/log/audit          ext4    defaults,noatime,nodev,nosuid                   0 2
UUID=a29905e6-2311-4038-b6fa-d1a8d4eea8e9 /var/log                ext4    defaults,noatime,nodev,nosuid                   0 2
UUID=ac026296-4ad9-4632-8319-6406b20f02cd /var                    ext4    defaults,noatime,nodev,nosuid                   0 2
UUID=238e1e7d-f843-4dbd-b738-8898d6cbb90d swap                    swap    defaults                                        0 0
UUID=dbf88dd8-32b2-4cc6-aed5-aff27041b5f0 /var/tmp                ext4    defaults,noatime,nodev,nosuid,noexec            0 0
tmpfs                                     /dev/shm                tmpfs   defaults,nodev,nosuid,noexec                    0 0
tmpfs                                     /tmp                    tmpfs   defaults,noatime,nodev,noexec,nosuid,size=256m  0 0
If you were to type df -h at this moment, you’d likely have output like the following, since we mounted the /mnt folders:
# df -h
Filesystem      Size  Used Avail Use% Mounted on
/dev/xvda1       20G  2.4G   18G  12% /
devtmpfs        1.9G     0  1.9G   0% /dev
tmpfs           1.9G     0  1.9G   0% /dev/shm
tmpfs           1.9G   17M  1.9G   1% /run
tmpfs           1.9G     0  1.9G   0% /sys/fs/cgroup
tmpfs           379M     0  379M   0% /run/user/1000
/dev/xvdf1      3.5G   15M  3.3G   1% /mnt/vartmp
/dev/xvdf3      892M   81M  750M  10% /mnt/home
/dev/xvdf4      4.4G  1.7G  2.5G  41% /mnt/usr
/dev/xvdf5      891M  3.5M  826M   1% /mnt/varlogaudit
/dev/xvdf6      1.8G   30M  1.7G   2% /mnt/varlog
/dev/xvdf7      5.2G  407M  4.6G   9% /mnt/var
But, after a reboot, we’ll see those folders mounted as /var, /var/tmp, /var/log, and so on. One more important thing: If you are using selinux, you will need to restore the default file and directory contexts — this prevents you from being locked out of SSH after a reboot!
# touch /.autorelabel;reboot
Wait a few minutes, and then SSH in to your instance once more. Post-reboot, you should see your folders mounted like the following:
# df -h
Filesystem      Size  Used Avail Use% Mounted on
 devtmpfs        1.9G  4.0K  1.9G   1% /dev
 tmpfs           1.9G     0  1.9G   0% /dev/shm
 tmpfs           1.9G   25M  1.9G   2% /run
 tmpfs           1.9G     0  1.9G   0% /sys/fs/cgroup
 /dev/xvda1   20G  5.7G   15G  29% /
 /dev/xvdf4  4.8G  2.6G  2.0G  57% /usr
 /dev/xvdf7  7.4G  577M  6.4G   9% /var
 /dev/xvdf3  2.0G  946M  889M  52% /home
 /dev/xvdf1  991M  2.6M  922M   1% /var/tmp
 /dev/xvdf6  1.4G  211M  1.1G  17% /var/log
 /dev/xvdf5  2.0G  536M  1.3G  30% /var/log/audit
 tmpfs           256M  300K  256M   1% /tmp
 tmpfs           389M     0  389M   0% /run/user/1002
 tmpfs           389M     0  389M   0% /run/user/1000
Voila! You’ve successfully created partitions that are compliant with CIS rules. From here you can select your instance in the EC2 dashboard, click “Actions” > “Stop,” and then “Actions” > “Image” > “Create Image” to create your new AMI using these partitions for use going forward!
Please note, I’ve done my best to include information for other situations, but these instructions may not apply to everyone or every template you may use on AWS or CentOS 7. Thanks again, and I hope this guide helps!
Thank you for taking the time to put this together. I followed your steps and everything worked perfectly. Awesome content!
Awesome article! This worked great for me. It’s really important to point out that the order in the fstab file is not the same as the order on the blkid command. Just keep an eye on which UUID is with what label or else you’ll have a problem! Keep up the good work!
Great article !!
I tried to follow all steps it’s looking good but unfortunately I cannot access my test EC2 instance after reboot 🙁
please you advice about How to restore the default file and directory contexts when using selinux?