• Skip to main content
  • Skip to footer

TechGirlKB

Performance | Scalability | WordPress | Linux | Insights

  • Home
  • Speaking
  • Posts
    • Linux
    • Performance
    • Optimization
    • WordPress
    • Security
    • Scalability
  • About Janna Hilferty
  • Contact Me

Security

WordPress Doesn’t Use PHP Sessions, and Neither Should You

What are PHP Sessions?

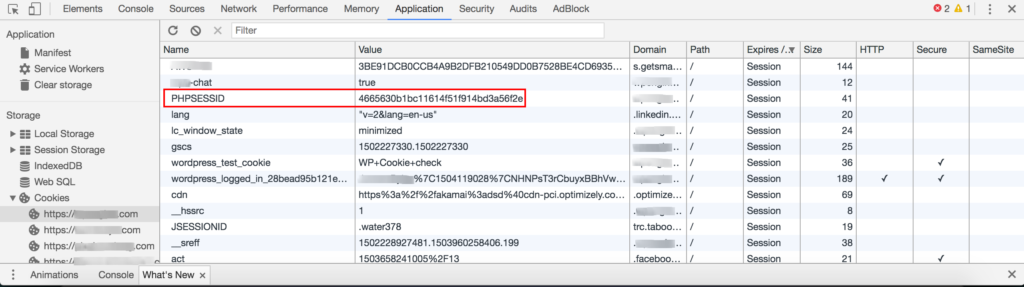
PHP Sessions are a type of cookie, meant to store or track data about a user on your site. For instance, a shopping cart total, or recommended articles might gather this kind of data. If a site is using PHP Sessions, you’ll be able to see them by opening your Chrome Inspector. Right-click the page and choose “Inspect Element”. Then select “Application” and expand the “Cookies” section. Below is an example of a site which is using PHP Sessions:

What’s wrong with PHP Sessions?

There are a number of reasons sites should not use PHP Sessions. Firstly, let’s discuss the security implications:

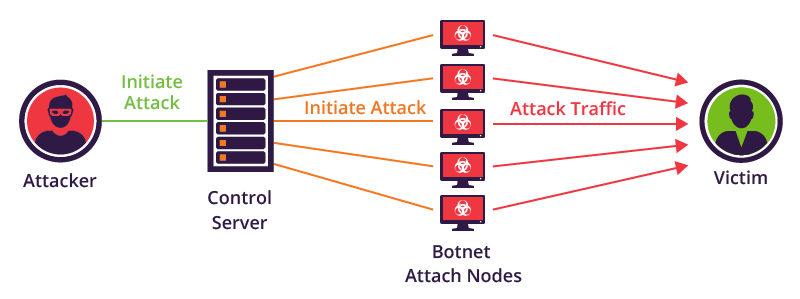
  • PHP Sessions can easily be exploited by attackers. All an attacker needs to know is the Session ID Value, and they can effectively “pick up” where another user “left off”. They can obtain personal information about the user or manipulate their session.
  • PHP Sessions store Session data as temporary files on the server itself, under the /tmp directory. This is particularly insecure on shared hosting environments. Since any site would have equal access to store files in /tmp, it would be relatively easy for an attacker to write a script to read and exploit these files.

So we can see PHP Sessions are not exactly the most secure way to protect the identity of the users on the site. Not only this, but PHP Sessions also carry performance implications. By nature, since each session carries a unique identifier, each new user’s requests would effectively “bust cache” in any page caching system. This system simply won’t scale with more concurrent traffic! Page cache is integral to keeping your site up and running no matter the amount of traffic you receive. If your site relies on PHP Sessions, you’re essentially negating any benefits for those users.

So I can’t track user behavior on my site?

False! You absolutely can. There are certainly more secure ways to store session data, and ways that will work better within cache. For example, WooCommerce and other eCommerce solutions for WordPress store session data in the database using a transient session value. This takes away the security risk of the temporary files stored with $_SESSION cookies. WordPress themselves choose to track logged-in users and other sessions with cookies of other names and values. So it is definitely possible to achieve what you want using more secure cookies.

I’m already using PHP Sessions. What now?

I’d recommend searching your site’s content to ensure you don’t have any plugins that are setting a “$_SESSION” cookie. If you find one, take a step back and look critically at the plugin. Is this plugin up to date? If not, update it! Is it integral to the way your site functions? If not, delete it! And if the plugin is integral, look out for replacement plugins that offer similar functionality for your site.

If the plugin itself is irreplaceable and is up to date, your next step should be asking the plugin developer what their plan is. Why does it use $_SESSION cookies? Are they planning on switching to a more secure method soon? The harsh reality is, due to the insecure nature of PHP Sessions, many WordPress hosts don’t support them at all.

As a last resort, if your host supports it you may want to check out the Native PHP Sessions plugin from Pantheon. Be sure to check with your host if this plugin is allowed and supported in their environment!

Preventing Site Mirroring via Hotlinking

Introduction

If you’re a content manager for a site, chances are one of your worst nightmares is having another site completely mirror your own, effectively “stealing” your site’s SEO. Site mirroring is the concept of showing the exact same content and styles as another site. And unfortunately, it’s super easy for someone to do.

How is it done?

Site mirroring can be accomplished by using a combination of “static hotlinking” and some simple PHP code. Here’s an example:

Original site:

site mirroring


Mirrored site:

site mirroring


The sites look (almost) exactly the same! The developer on the mirrored site used this code to mirror the content:

<?php
//get site content
        $my_site = $_SERVER['HTTP_HOST'];
        $request_url = 'http://philipjewell.com' . $_SERVER['REQUEST_URI'];
        $ch = curl_init();
        curl_setopt($ch, CURLOPT_URL, $request_url);
        curl_setopt($ch, CURLOPT_FOLLOWLOCATION, true);
        curl_setopt($ch, CURLOPT_RETURNTRANSFER, TRUE);
        $site_content = curl_exec($ch); //get the contents of the site from this server by curling it
        //get all the href links and replace them with our domain so they don't navigate away
        $site_content = preg_replace('/href=(\'|\")https?:\/\/(www\.)?philipjewell.com/', 'href=\1https://'.$my_site, $site_content);
        $site_content = preg_replace('/Philip Jewell Designs/', 'What A Jerk Designs', $site_content);
        echo $site_content;
?>

Unfortunately it’s super simple with just tiny bits of code to mirror a site. But, luckily there are some easy ways to protect your site against this kind of issue.

Prevent Site Mirroring

There are a few key steps you can take on your site to prevent site mirroring. In this section we’ll cover several prevention method options for both Nginx and Apache web servers.

Disable hotlinking

The first and most simple is to prevent static hotlinking. This essentially means preventing other domains from referencing static files (like images) from your site on their own. If you host your site with WP Engine, simply contact support via chat to have them disable this for you. If you host elsewhere, you can use the below examples to see how to disable static hotlinking in Nginx and Apache. Both links provide more context into what each set of rules does for further information.

Nginx (goes in your Nginx config file)

location ~* \.(gif|png|jpe?g)$ {
expires 7d;
add_header Pragma public;
add_header Cache-Control "public, must-revalidate, proxy-revalidate";
# prevent hotlink
valid_referers none blocked ~.google. ~.bing. ~.yahoo. server_names ~($host);
if ($invalid_referer) {
rewrite (.*) /static/images/hotlink-denied.jpg redirect;
# drop the 'redirect' flag for redirect without URL change (internal rewrite)
}
}
# stop hotlink loop
location = /static/images/hotlink-denied.jpg { }

Apache (goes in .htaccess file)

RewriteEngine on
RewriteCond %{HTTP_REFERER} !^$
RewriteCond %{HTTP_REFERER} !^http(s)?://(www\.)?yourdomain.com [NC]
RewriteCond %{HTTP_REFERER} !^http(s)?://(www\.)?google.com [NC]
RewriteCond %{HTTP_REFERER} !^http(s)?://(www\.)?bing.com [NC]
RewriteCond %{HTTP_REFERER} !^http(s)?://(www\.)?yahoo.com [NC]
RewriteRule \.(jpg|jpeg|png|gif|svg)$ http://dropbox.com/hotlink-placeholder.jpg [NC,R,L]


Disable CORS/Strengthen HTTP access control

The above steps will help prevent others from linking to static files on your site. However, you’ll also want to either disable CORS (Cross Origin Resource Sharing), or strengthen your HTTP access control for your site.

CORS is the ability for other sites to reference links to your own site in their source code. By disabling this, you’re preventing other sites from displaying content hosted on your own site. You can be selective with CORS as well, to only allow references to your own CDN URL, or another one of your sites. Or you can disable it entirely if you prefer.

According to OWASP guidelines, CORS headers allowing everything (*) should only be present on files or pages available to the public. To restrict the sharing policy to only your site, try using these methods:

.htaccess (Apache):

Access-Control-Allow-Origin: http://www.example.com

This allows only www.example.com to access your site. You can also set this to be a wildcard value, like in this example.

Nginx config (Nginx):

add_header 'Access-Control-Allow-Origin' 'www\.example\.com';

This says to only allow requests from www.example.com. You can also be more specific with these rules, to only allow specific methods from specific domains.

Disable iframes

Another step you may want to take is disabling the ability for others to create iframes from your site. By using iframes, some users may believe content on an attacker’s site is legitimately from your site, and be misled into sharing personal information or downloading malware. Read more about X-Frame-Options on Mozilla’s developer page.

Use “SAMEORIGIN” if you wish to embed iframes on your own site, but don’t want any other sites to display content. And use “DENY” if you don’t use iframes on your own site, and don’t want anyone else to use iframes from your site.

Block IP addresses

Last, if you’ve discovered that another site is actively mirroring your own, you can also block the site’s IP address. This can be done with either Nginx or Apache. First, find the site’s IP address using the following:

dig +short baddomain.com

This will print out the IP address that the domain is resolving to. Make sure this is the IP address that shows in your site’s Nginx or Apache access logs for the mirrored site’s requests.

Next, put one of the following in place:

Apache (in .htaccess file):

Deny from 123.123.123.123

Nginx (in Nginx config):

deny 123.123.123.123;


File a DMCA Takedown Notice

Last, if someone is mirroring your site without your explicit approval or consent, you may also want to take action by filing a DMCA Takedown Notice. You can follow this DMCA guide for more information. The guide will walk you through finding the host of the domain mirroring your own site, and filing the notice with the proper group.


Thank you to Philip Jewell for collaborating on this article! And thanks for tuning in. If you have feedback, additional information about blocking mirrored sites drop a line in the comments or contact me.

Protecting Your Site From Content Injection

What is Content Injection?

Content Injection, otherwise known as Content Spoofing, is the act of manipulating what a user sees on a site by adding parameters to their URL. This act is a known form of attack on a website. While Content Injection and XSS (Cross Site Scripting) Attacks are similar, they differ in a few key ways. Firstly, XSS attacks specifically target users by using <script> parameters, mainly using JavaScript. Content Injection by comparison mainly relies on adding parameters to the end of a static URL (/login.php for example).

Here’s a basic example:

content injection

For static files like error pages (in this case a 400 error), attackers can manipulate the text on the page to say what they want. You’ll see in the URL bar that the attacker added extra text to the URL which made the error page print the text since it was part of the URL. Notice, they couldn’t make “www.hackersite.com” actually a clickable link in the basic output which is a good sign. But, easily misled visitors may still try to navigate to “www.hackersite.com” based on the text on this page. The general intent of content injection is usually phishing. Or in other words, getting users to enter their sensitive information by misleading them.

So what’s the fix?

In the interest of protecting your site from content injection on static files like the above, you’d want to use the “AllowEncodedSlashes” directive in Apache like so:

AllowEncodedSlashes NoDecode

With this directive you’re telling Apache to not necessarily show a 404 when “encoded slashes” like %2F and %5C in the URL are added, but instead to show the actual page that *should* have come up. Here’s an example from one of my own sites, with and without encoded slashes set to NoDecode:

content injection

And with the NoDecode directive set:

content injection

So, using the NoDecode option I’m able to let my users see the correct page, even if someone tried to manipulate the URL to print other text.

Another alternative would be to rewrite static files to your WordPress theme’s 404 page. This way users see your custom page instead of the default white-text static error pages (since they can be manipulated as we saw). This isn’t always the best option for all sites though. It all depends on how you want to handle requests with extra content added to the end.

These types of content injection are usually pretty low-risk. This is because all the attacker can do is manipulate text on specific files. If your site is being affected by XSS though, to where they are able to inject URL links and formatting on a page, that is a more serious concern. Use this guide to help prevent XSS on your site.


That’s all, folks! Have more input on content injection? More tips or tricks? Want to hear more? Let me know in the comments or contact me.


The Anatomy of a DDoS

What does DDoS stand for?

First, let’s define the term “DDoS.” DDoS stands for “Distributed Denial of Service.” The concept behind a targeted DDoS attack is: overwhelm a server or site’s resources in order to bring it down. There can be many reasons behind a DDoS: personal vendettas, political disputes, disagreements, getting past security or firewall barriers, or even just for “fun.”

The effects of a DDoS attack can be truly devastating. Beyond server downtime, companies can suffer brand damage, bandwidth/usage overages, and more.

How do DDoS attacks happen?

So how would one go about overwhelming a server’s resources? Most commonly this happens by attackers building a “botnet.” Botnets are typically a series of malware-infected machines connecting to the internet. Attackers will try to add devices like routers, computers, web servers and more to their botnet. A common method for this is to use “brute force” methods to hack into your site or device. Once a device is infected with malware, the attacker can direct the “army” of infected devices to send thousands of simultaneous requests to a site. As a result, one attacker can bring an entire site crumbling down.

a ddos
Source: Incapsula

The tricky part about the DDoS method is that the requests are coming from a wide range of IP addresses and user-agents. In this way, the attack is “distributed.” With this method the attack is coming from a vast network of devices. There is also a term “DoS” which just stands for “Denial of Service.” Plain “DoS” attacks originate from the same IP address. With this method, security systems are easily able to detect and block the attack. The system simply has to block the IP address to thwart the attack.

DDoS Mitigation

Once a DDoS is started, it’s pretty hard to mitigate the attack. Usually by the time an attack starts, the attacker knows the origin IP address where your site’s content resides. So by the time you get behind a service like CloudFlare or another Reverse Proxy service, it’s too late. While these services “hide” the origin IP address so attackers can’t see it. However, if they’ve found it already, the damage is done. In this case, you’ll need to get behind a DDoS protection service and then move your origin server and update DNS records.

Some common DDoS protection services include:

CloudFlare Business/Enterprise

Sucuri CloudProxy

Imperva Incapsula

Akamai Prolexic

The services above are great to use in preparation of an attack. If you’re already being attacked by a DDoS you would need to implement a service above and then change IP addresses. Or, you can use HiveShield from HiveWind, which can be deployed inside your current infrastructure. You can activate HiveShield even when your site is already being attacked. It will automatically begin deflecting the bad actors without needing to change Origin IPs. This is what sets HiveShield apart from its competitors.


If you want to try HiveShield DDoS protection on your own server, use the coupon code TCHGRLKB. This coupon code is good for 8 cores/$50 a month OR 16 cores/$100 a month, each with a free 30 day trial – a 50% savings!


Whichever service you use, be sure you use one to protect your site now! This way you’re protected against DDoS attacks. And, you won’t have to scramble to move your origin server if you’re attacked. So, which of these services is best? Read up, compare, and find which one is right for your business needs!

Have more questions about security? Is there a topic I didn’t cover? Feel free to let me know in the comments, or contact me.

Brute Force Attacks and WordPress

Introduction

WordPress is a leading Content Management System used by around 27% of all websites. As its market share grows, more and more attacks target WordPress sites. A common type of attack is called “Brute Force.” In this method, the attacker simply guesses combinations of usernames and passwords repeatedly until they find success. Most often, these attacks are made by bots.

There are some simple ways to avoid penetration by a Brute Force attacker. Prevention is managed at two primary levels: Firewall-level, and WordPress-level.


brute force attacks

Firewall-level prevention

One of the best ways to prevent Brute Force attacks is using a firewall. If you manage multiple sites on the same server, the protection you put in place at this level will protect all your sites. Additionally, if attacks like this can be mitigated at the server-level, this protection won’t have to be processed by PHP/WordPress, which means fewer server resources are being used.

Cloudflare

CloudFlare is a reverse-proxy service. In this scenario you direct your site’s nameservers to point to CloudFlare, and manage the A records or CNAME records from your DNS provider at the CloudFlare level. This option is ideal for a few reasons. First, CloudFlare masks your site’s “Origin IP,” or the IP address of the server where your site’s content is hosted. The IP masking prevents attackers from sending attacks directly to your server and bringing your site down.

On top of the natural benefits of using this service, CloudFlare offers a rate-limiting option. Using “Protect Your Login,” you can configure rules that will block IPs if they have made POST requests to your login page within the last 5 minutes.

The benefit of blocking the IP addresses with CloudFlare is that the attackers don’t even have to touch your site to get denied. So, no server resources on the server where your site is hosted will be used.

Sucuri WAF

Sucuri WAF works similarly to CloudFlare in that it offers protection as a reverse-proxy. Using Sucuri WAF will also mask your site’s origin IP, and block IP addresses before they can reach your origin server. The difference between the two is that Sucuri is a leader in website security. Meaning, their service is geared specifically towards security, protection, and compatibility. Additionally, they offer more configuration options specific to security overall.

HiveWind

HiveWind is a DDOS Mitigation service that sits in front of your site’s server as well, as a Cloud Load Balancer. Their services cover a large number of attacks that might affect your site, and the layer is cloud-based. The HiveWind firewall can automatically detect bad-actors like Brute Force attacks and botnets. The large difference between HiveWind and its competitors is that it cumulatively blocks attacks. That means if an IP has attacked another site, it’s blocked for all users on HiveWind’s service. And unlike many other DDOS services, even the enterprise-level services are flat-rate no matter the scale of the attack.


If you want to try HiveShield DDoS protection on your own server, use the coupon code TCHGRLKB. This coupon code is good for 8 cores/$50 a month OR 16 cores/$100 a month, each with a free 30 day trial – a 50% savings!


Incapsula

Incapsula is a reverse proxy system used as a CDN to sit in front of your origin server. While the setup process can be trying sometimes, the end result is a thoroughly-secured website. Their IncapRules security system uses advanced detection to identify whether the user is a bot, and block sessions. And, what’s unique about Incapsula’s system is that it allows you to configure the protection to be as aggressive as you want. They also offer a resiliency score to test whether your site is ready to handle a DDOS or not.


WordPress-level prevention

If firewall-level protection isn’t possible, you can begin looking at WordPress-level protection. While this kind of protection leaves your server resources more vulnerable, it’s still helpful. The attackers will still be denied. But, making WordPress do the heavy-lifting is more taxing on your server.

Below we’ll cover some common options for your WordPress site. These options are still helpful to block potential brute force attackers on your site.

WordFence

The WordFence security plugin is an easy way to automatically block attackers. Using their settings, you can force users to set strong passwords, lock users out after failed attempts, and automatically ban users who try common usernames. One of the most common usernames is simply “admin.” With this plugin you can block anyone who tries this user. Read their blog post for more information.

Sucuri Security

Using the Sucuri Security plugin you can block Brute Force attacks. And not only this, you can also use their services to scan for malware and actively track file changes. What’s unique about this plugin is the level of logging it offers. Plus, the logging doesn’t go to your local database. It’s stored securely with Sucuri themselves. The Brute Force detection is best when used with their WAF mentioned above.

iThemes Security

The iThemes Security plugin (previously known as Better WP Security) is one of the widest-used security plugins. It offers 30 different ways to secure your site. One of these options includes moving your login page to a different URL. Since many Brute Force attacks rely on the login page being called “wp-login.php,” this alone can defer many attacks. Like HiveWind, iThemes security uses a brute force detection network. So, if one IP is blocked on another site, it’s blocked for yours too.

All-in-One WP Security

The All-in-One WP Security plugin offers a cookie-based detection of bots and brute force attacks. Since bots generally do not load assets like cookies, javascript, or css, this allows them to block bad actors. And, unlike other plugins, this one allows you to block attackers by IP address or user-agent. It also includes a “captcha” which makes the user prove they are human.

Hide Login Plugins

There are a number of plugins which will rewrite your login URL. Some common examples include: WPS Hide Login, Rename WP Login, and Loginizer. A single-function plugin like this is not always the most ideal. For instance, if you use page caching on your site, you’ll need to ensure your new login page is uncached. But, these plugins will deflect some brute force attacks simply because bots won’t know where to login.


WordPress Best Practices

Last, to prevent Brute Force attacks you should follow some simple best practices. This list will help prevent many kinds of attacks.

Don’t use the username “admin.”

This is the most commonly-used username in existence. Since Brute Force attackers need to guess your username and password, using this username gives them half the equation right away. Be smart! Choose a more unique username.

Use a captcha.

Captchas are usually image or math-based forms for testing whether a user is a human or not. Since most brute force attacks come from bots, this simple trick will prevent most attackers.

Use 2-factor authentication.

This method means a bot would have to guess two sets of authentication, one of which is constantly changing. Google Authenticator is one of the most common options. Be sure to install the app on your phone as well! This is how the system works for authentication.

Require strong passwords.

For any high-level user on your site (like an Author or Administrator) you should require they use a complex password. These days, adding a number to the end of a word won’t cut it. You’ll want to make sure your password is long, and includes many combinations of numbers, letters, and characters. Use these recommendations when choosing a password.

Keep everything updated.

I can’t stress this point enough. The most common source of malware on sites is outdated software. New exploits in software are being found every day. Most plugins and themes will release a patch or update as soon as one is uncovered. So this means keeping everything updated is super important. This certainly includes WordPress itself. If you manage many sites, using a system like MainWP or ManageWP can help you manage updates from a single dashboard.

Never log in from a public computer.

Public computers at your library or internet cafes are not the most secure. Casual hackers may have installed software on these computers that records everything you type. You should also never choose for a public computer to remember your password.

Use SSL on your login page.

Last, using SSL encryption on any page where you enter a password is important. This encrypts the data you send over the network between your local computer and your website. Any bad actors listening on your network won’t be able to read encrypted information.


Conclusion

So, there you have it! A comprehensive list of methods to protect your WordPress site. And, with these quick and easy methods you can effectively prevent Brute Force attackers from accessing your site. Remember also that using a firewall or plugin isn’t everything. You also need to check the list of best practices to secure your site. With all these powers combined, you can be sure your site is safe.

Do you have more tips and tricks? Have more thoughts on Brute Force attacks? Comment below or contact me to talk more about security.

4 Important Ways to Identify a Botnet

What is a botnet?

A botnet is a series of internet devices (computers, websites, servers, modems, mobile phones, and more) infected with malware, harnessed together. Their purpose is to infect more devices with malware to build their network even further.

Botnets are sometimes very hard to identify because of their nature to switch IP addresses frequently, so as to not trigger security software to take action. Furthermore, botnets can “spoof” legitimate browsers in their requests, making it seem like the request is coming from a normal web browser or mobile phone.

These attributes aside, there are still a few key tricks you can use to identify a botnet.

Bots don’t load assets

Try visiting your site, then look through your site’s access logs. Locate the requests associated with your IP address. Do you see a “GET /” entry in the log? You should! But you should also see a number of static files requested after that, like requests for your theme’s CSS and JavaScript files.

One key attribute of botnets is that they do not load these CSS and JavaScript files. For these you will ONLY see a “GET /” entry, but no static files requested. What’s tricky about this is because botnets don’t load Javascript, these visits to your site are invisible on your Google Analytics reports. You’ll need access to logs from your site’s server itself to identify a botnet.

Bots make illegitimate POST requests

Another way to identify a botnet is to look at the behavior of the IP address: they will often try to make “POST” requests instead of just “GET” requests. A POST request is a request intended to update information, or login to a site. In WordPress, the most common places for this would be your /wp-login.php page, and your /xmlrpc.php page.

The /wp-login.php page is where you and your site authors will log into your WordPress site. A POST request here comes from someone trying to log into the site. On WP Engine, POST requests to the login page without loading the page’s assets are blocked, meaning you are safe from being infected by malware. But, these botnets may be bothersome all the same for various reasons.

Similarly, the /xmlrpc.php page is another page targeted by botnets. This page only accepts POST requests from mobile posting apps, so that you can remotely update your site. Botnets will target these pages in hopes of some kind of security exploit, so they can infect your site and server with malware. On WP Engine, requests to XMLRPC are only accepted from legitimate users on your site, which is another way they protect you from this kind of traffic.

Bots may spoof “fake” browser versions

In your site’s access logs, you’ll generally see entries like this:

172.56.7.237 techgirlkb.guru - [07/Aug/2017:02:32:11 +0000] "GET /2017/08/quick-wins-database-optimization/ HTTP/1.1" 200 9064 "http://m.facebook.com/" "Mozilla/5.0 (Linux; Android 7.1.2; Pixel XL Build/NKG47M; wv) AppleWebKit/537.36 (KHTML, like Gecko) Version/4.0 Chrome/59.0.3071.125 Mobile Safari/537.36 [FB_IAB/FB4A;FBAV/135.0.0.22.90;]; WPEPF/1"

This section in quotes “Mozilla/5.0 (Linux; Android 7.1.2; Pixel XL Build/NKG47M; wv) AppleWebKit/537.36 (KHTML, like Gecko) Version/4.0 Chrome/59.0.3071.125 Mobile Safari/537.36 [FB_IAB/FB4A;FBAV/135.0.0.22.90;]; WPEPF/1” is the “user agent string” for the request that came in. Normally with a long string like this, it looks like a pretty legitimate user. But often times, botnets will use a user agent string that looks legitimate, but is just slightly off. Here’s an example of one I see a lot:

"Mozilla/5.0 (Windows NT 6.1; WOW64; rv:40.0) Gecko/20100101 Firefox/40.1"

This one is really tricky. Based on the results of my user agent string lookup, it appears to be a Windows 7 user, using Firefox version 40.1 as a web browser. Only, Firefox doesn’t have a version 40.1. You can find the real versions of Firefox on their website. This is another way in which it can be hard to identify a botnet: they evade normal security software and firewalls by pretending to be legitimate user agents.

Botnets will change IPs after an invalid response

Last, the other key behavioral trait of a botnet is that it will rotate IP addresses. Usually this happens when the botnet detects it’s been blocked. For instance, if it receives an empty response or a 403 Forbidden response, this signals the botnet that it’s time to move on to a different IP address from another one of its malware-infected devices in the network.

There are several known Internet Service Providers and cell carriers whose devices are most vulnerable to this kind of botnet and to malware. You can read more about it in this comprehensive study done by WordFence. You’ll notice if you do an IP lookup for the IP addresses making these requests, that most are from obscure countries, with the same telecom provider.

One way you can battle the rotating IP addresses is by limiting the traffic allowed to your site to only countries you know to be legitimate. Or (if that’s going to be a really long list), you can alternatively block traffic from the countries you see these botnet requests originating from.

  • « Previous Page
  • Page 1
  • Page 2

Footer

Categories

  • Ansible
  • AWS
  • Git
  • Linux
  • Optimization
  • Performance
  • PHP
  • Scalability
  • Security
  • Uncategorized
  • WordPress

Copyright © 2025 · Atmosphere Pro on Genesis Framework · WordPress · Log in