• Skip to main content
  • Skip to footer

TechGirlKB

Performance | Scalability | WordPress | Linux | Insights

  • Home
  • Speaking
  • Posts
    • Linux
    • Performance
    • Optimization
    • WordPress
    • Security
    • Scalability
  • About Janna Hilferty
  • Contact Me

Amazon

Send email with Amazon SES on Google Cloud Hosting

The Google Cloud email dilemma

If you host your WordPress website on Google Cloud infrastructure, you’ve probably noticed you can’t send outgoing email through standard email ports on your server. Google allows only Google Apps to send email through ports 465 and 587, and prohibits any service from sending mail through port 25.

Many email providers have created better ways of sending or relaying email through alternate ports or APIs. But Microsoft Office 365 among others are left in the lurch when it comes to sending outgoing emails through Google Cloud servers. If you’re one of the many affected by this issue, this guide will help you configure email through Amazon Simple Email Service (SES) to send outgoing emails from your WordPress site. Many thanks to my friend Jay Hill for contributing these steps!

Set up SES DNS records

The first step is to validate your domain with the SES service–This requires adding DNS records with your DNS provider. The process is the same with any DNS provider, but we are using CloudFlare’s DNS dashboard in this example.

Log in to the Amazon Web Services console and navigate to the SES page. Then click “Domains” from the left-hand navigation menu. Click “Verify a new domain” and enter your domain name. If you want to utilize DKIM then you can also generate DKIM signatures in this step. On the next screen you’ll be given your DNS records to set up within your DNS provider.

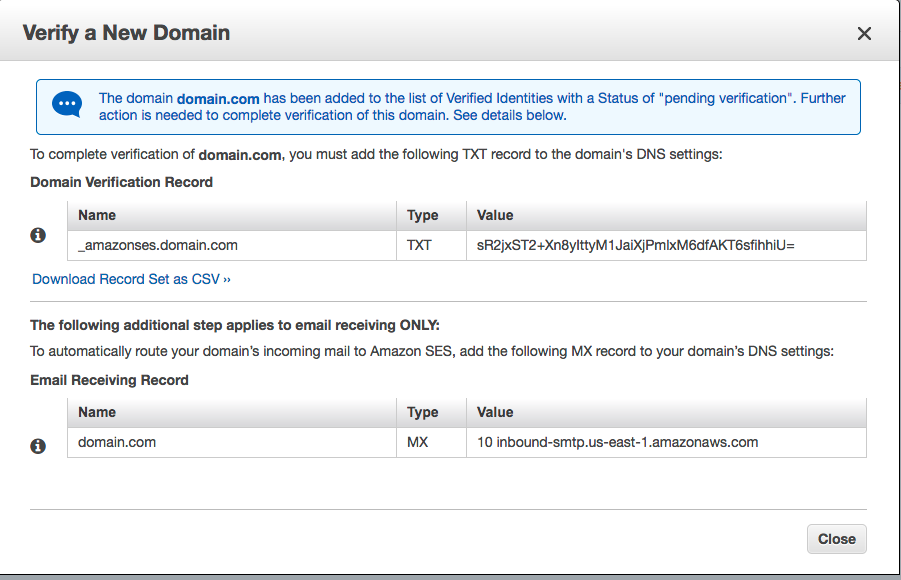
You can take the Type and Value fields from these records and paste them directly into your DNS provider’s dashboard. In our CloudFlare example simply log in, choose your domain name, and select “DNS records.” In the dropdown menu to select a type of record, choose “TXT” – then in “Value” enter the “Name” field from the Domain Verification Record, and in the box next to it, enter the “Value” field. Once Amazon SES has been able to detect the records have been added, your domain is verified for use with their service.

If you utilize an email provider for your domain’s emails such as Google Suite, Outlook365, or another email server then you do not need to input the MX record and will leave your current MX records as is–this means only your outgoing emails will be handled by Amazon SES.

Create an SMTP user

Now that Amazon has been able to verify our domain for sending email we need to create an SMTP user for our WordPress site to use for sending email. On the SES console home page, click “SMTP Settings” from the left-hand navigation. Then click the “Create My SMTP Credentials” button. Leave the default username as-is and click “Create.”

On the next screen be sure to download your login credentials–we will need them in the next step. To do this, just click “Show User SMTP Security Credentials” and you can copy and paste them into your text editor of choice.

Install and configure SMTP plugin

Now that we’ve configured Amazon SES it’s time to configure your WordPress install to utilize the service. We’re going to be using the Easy WP SMTP plugin for this step. You can install this plugin by going to your plugins page in the WordPress Admin Dashboard of your site and going to Plugins > Add New > search for Easy WP SMTP > Install. Once installed you’ll want to activate the plugin so  we can configure it.

Google Cloud servers have ports 25, 465, and 587 disabled by default, but you can still use port 2587.

  • In the “From” field, put an email address you want WordPress to send email from. This could be anything as long as it has your domain name in it.
  • For the “Name” you can put anything you want your emails to show as from.
  • You can get your SMTP Host at the Amazon SES SMTP Settings page. If you setup SES in the US-East-1 region it will be: email-smtp.us-east-1.amazonaws.com.
  • Ensure that TLS is selected for the Type of Encryption setting.
  • For the sending port, input 2587.
  • Check the SMTP Authentication to yes and input your SMTP username and password that was created in the previous step.

Your settings should then look similar to this:


Send a test email

Now that your settings are configured, you’ll want to send a test email to make sure it’s working right. Right now your SES account is still in Sandbox mode, so we need to configure an email address to send email to first. In your Amazon SES console, click “Email Addresses.”

Click “Verify A New Email address,” enter in the email address you want to verify. Then click the “Verify This Email Address.” This will send an email to the specified email address. You’ll need to click the link within it to verify your email address. If you do not verify your email address, Amazon won’t send the email.

Once verified, head to the Easy WP SMTP Settings page in your dashboard and scroll down to the “Testing and Debugging Settings” section. Input the verified email address, a subject and message, and then send. Check your email to ensure that it was delivered. If it was not delivered, confirm your email address is validated and your port settings.

Request Amazon release Sandbox Mode

Amazon keeps your SES service in what is called Sandbox Mode which requires that all email addresses you send to be verified before email deliverability can be achieved. We need to request Amazon enable production access to SES by utilizing their support system for a Service Limit Increase.

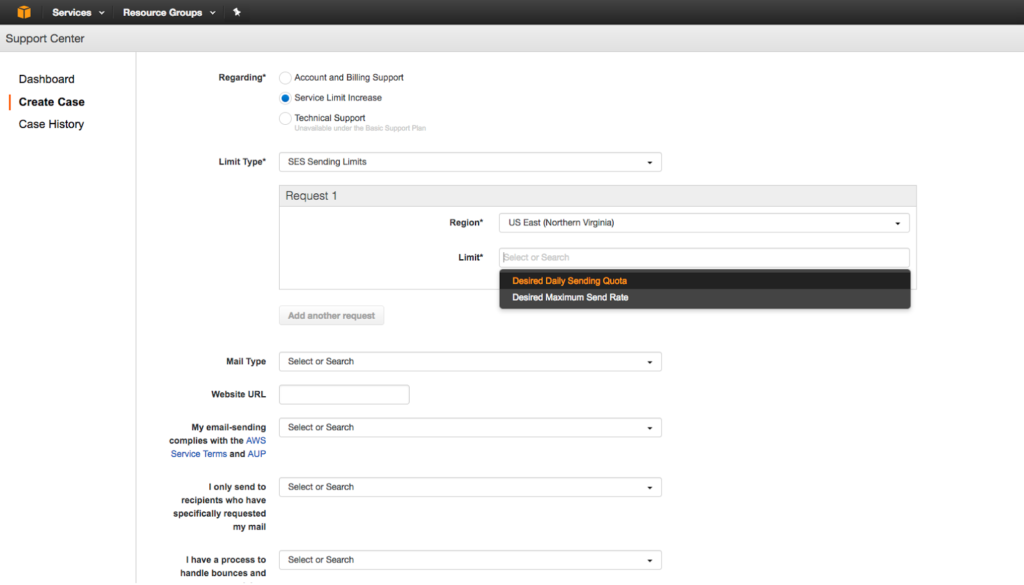
Ensure “Service Limit Increase” is selected, and “Limit Type” is set for “SES Sending Limits.” In “Request 1” choose the region you setup SES for and then choose “SES Production Access.” Fill out the rest of the boxes and submit the request. Amazon typically takes 24 hours to grant access to Production Mode for SES.

Once they have taken SES out of Sandbox mode you should be able to test your site’s emails to ensure they’re delivering properly. Be sure to test any eCommerce emails, contact forms, or transactional emails. You should also ensure that your contact forms have a captcha configured. This ensures spammers are not able to abuse your forms, which in turn abuses your SES service.


And that’s it! You’ve successfully configured Amazon SES to send your outgoing emails from WordPress. Have any additional thoughts to add, concerns, comments? Add a comment, or Contact Me.

5 Winning WordPress Search Solutions

The Problem

If you’ve designed many WordPress sites, you may have noticed something: The default search function in WordPress… well… it sucks. It seriously does. If you’re unaware, allow me to enlighten you.

Firstly, the search by default only searches the title, content, and excerpt of default pages and posts on your site. Why does this suck? Because your users probably want to find things that are referenced in Custom Post Types. This includes WooCommerce orders, forums, and anything else you’ve separated to its own specific type of “post.”

The default WordPress search function also doesn’t intuitively understand searches in quotations (“phrase search”), or sort the results by how relevant they are to the term searched.

And, the default WordPress search uses a super ugly query. Here’s the results on my own default search when I searched for the word “tech” on my site:

As a performance expert, this query makes me cringe. These queries are very unoptimized! And they don’t scale well with highly-trafficked sites. Multiple people running searches on your site at once, especially ones with high post counts, will slow your site down to a crawl.

The Solution

So if WordPress search sucks, what is the best option for your site? I’m glad to explain. Firstly, if there’s any way for you to offload the searches to an external service, this will make your site much more “lightweight” on the server. This way, your queries can run on an external service specifically designed for sorting and searching! In this section I’ll explain some of the best options I’ve seen.

Algolia Search

Algolia is a third party integration you can use with WordPress. With this system, your searches happen “offsite,” on Algolia’s servers. It returns your results lightning fast. Here’s a comparison of using WordPress default search, to Algolia’s external query system, on a site with thousands of events:

Default WP search:

Algolia search:

Algolia clearly takes the cake here, returning results in .5 seconds compared to nearly 8 seconds. Not only is it fast, offloading searches to external servers optimized for query performance helps reduce the amount of work your server has to do to serve your pages. This means your site will support more concurrent traffic and more concurrent searches!

Lift: Search for WordPress

The Lift plugin offers similar benefits to Algolia in that it offers an offsite option for searching. This plugin specifically uses Amazon CloudSearch services to support your offsite searches. The major downside to this plugin is that it hasn’t been actively maintained: it hasn’t been updated in over two years. Here’s a cool diagram of how it works:

source: colorlib.com

While this plugin hasn’t been updated in quite a while, it works seamlessly with most plugins and themes, offers its own search widget, and can even search media uploads. WP Beginner has a great setup guide for help getting started.

ElasticPress

ElasticPress is a WordPress plugin which drastically improves searches by building massive indexes of your content. Not only does it integrate well with other post types, it allows for faster and more efficient searches to display related content. This plugin requires you to have ElasticSearch installed on a host. This can be the server your site resides on (if your host allows), your own computer, a separate set of servers, or using Elastic Cloud to host it on AWS using ElasticSearch’s own service. To manage your indexes, you’ll want to use WP CLI.

ElasticPress can sometimes be nebulous to set up, depending on your configuration and where ElasticSearch is actually installed. But the performance benefits are well worth the trouble. According to pressjitsu, “An orders list page that took as much as 80 seconds to load loaded in under 4 seconds” – and that’s just one example! This system can take massive, ugly search queries and crunch them in a far more performant environment geared specifically towards searching.

Other options

There are some other free, on-server options for search plugins. These plugins will offer more options for searching intuitively, but will not offer the performance benefits of the ones mentioned above.

Relevanssi

Relevanssi is what some in the business call a “Freemium” plugin. The base plugin is free, but has premium upgrades that can be purchased. Out of the box, the free features include:

  • Searching with quotes for “exact phrases” – this is how many search engines (like Google) search, so this is an intuitive win for your users.
  • Indexes custom post types – a big win for searching your products or other
  • “Fuzzy search” – this means if users type part of a word, or end up searching with a typo, the search results still bring up relevant items.
  • Highlights the search term(s) in the content returned – this is a win because it shows customers why specific content came up for their search term, and helps them determine if the result is what they need.
  • Shows results based on how relevant or closely matched they are, rather than just how recently they were published.

The premium version of Relevanssi includes:

  • Multisite support
  • Assign “weight” to posts so “heavier” ones show up more or higher in results
  • Ability to import/export settings

Why I don’t recommend Relevanssi at the top of my list: it’s made to be used with 10,000 posts or less. The more posts you have, the less performant it is. This is because it still uses MySQL to search in your site’s own database, which can weigh down your site and the server it resides on. Still, it offers more options for searching than many! It is a viable option if you have low traffic and fewer than 10,000 posts.

SearchWP

SearchWP claims to be the best search plugin out there. It certainly offers a lot of features, either way. Out of the box, it can search: PDFs, products and their description, shortcode data, terms and taxonomy data, and custom field data. That’s a pretty comprehensive list!

Above you can see some of the nice customizable settings like weight, excluding options, custom fields, and how to easily check/uncheck items to include.

However, SearchWP comes with a BIG asterisk from me. SearchWP will create giant tables in your database. Your database should be trim to perform well. You want to be sure the size of your databases fit within your Memory buffer pool for MySQL processes to ensure proper performance. Be absolutely certain you have enough server resources to support the amount of data stored by SearchWP!


These solutions are the only ones I would truly recommend for sites. There certainly are others available, but they work using AJAX which can easily overwhelm your server and slow down your site. Or, they use equally ugly queries to find the search terms.

As a rule of thumb, I absolutely recommend an offsite option specifically optimized for searches. If this simply isn’t an option, be sure to use a plugin solution that offers the range of features you need without weighing down your database too much.

Is there a search solution you like on your own site? Is there an important option I left off? Let me know in the comments, or contact me.


Footer

Categories

  • Ansible
  • AWS
  • Git
  • Linux
  • Optimization
  • Performance
  • PHP
  • Scalability
  • Security
  • Uncategorized
  • WordPress

Copyright © 2025 · Atmosphere Pro on Genesis Framework · WordPress · Log in