• Skip to main content
  • Skip to footer

TechGirlKB

Performance | Scalability | WordPress | Linux | Insights

  • Home
  • Speaking
  • Posts
    • Linux
    • Performance
    • Optimization
    • WordPress
    • Security
    • Scalability
  • About Janna Hilferty
  • Contact Me

Posts

How the InnoDB Buffer Pool Allocates and Releases Memory

As you may know or have noticed, Memory utilization can be a difficult to truly understand. While tools like free -m can certainly help, they aren’t necessarily a true indication of health or unhealth. For example, if I see 90% Memory utilization, that’s not exactly an indication that it’s time to add more resources. The nature of Memory is to store temporary data for faster access the next time it is needed, and because of this, it tends to hold onto as much temporary data as it can, until it needs to purge something out to make more space.

90% utilization but no swap usage

About the InnoDB Buffer Pool

InnoDB (a table storage engine for MySQL), has a specific pool of Memory allocated to MySQL processes involving InnoDB tables called the InnoDB Buffer Pool. Generally speaking, it’s safest to have an InnoDB Buffer Pool at least the same size as your database(s) on your server environment to ensure all tables can fit into the available Memory.

As queries access various database tables, they are added to Memory in the InnoDB Buffer Pool for faster access by CPU processes. And if the tables being stored in Memory are larger than what is allocated, the tables will be written to swap instead. As I covered in my recent article on Memory and IOWait, that makes for increasingly painful performance issues. 

The InnoDB Buffer Pool is clingy

Yep, that’s right. Like I mentioned above, Memory tends to hold onto the things it’s storing for faster access. That means it doesn’t purge items out of Memory until it actually needs more space to do so. Instead, it uses an algorithm called Least Recently Used (LRU) to identify the least-needed items in cache, and purge that one item out to make room for the next item. So unless your server has simply never had the need to store much in the InnoDB Buffer Pool, it will almost always show high utilization–and that’s not a bad thing! Not unless you are also seeing swap usage. That means something (in my experience, generally MySQL) is overusing its allocated Memory and is being forced to write to disk instead. And if that disk is a rotational disk (SATA/HDD) instead of SSD, that can spiral out of control very easily. 

All this to say, the InnoDB Buffer Pool will hang onto stuff, and that’s because it’s doing its job–storing database tables for faster access the next time they are needed. So don’t take high utilization as a sign of outright unhealth! Be sure to factor swap usage into the equation as well.  

Allocating Memory to the InnoDB Buffer Pool

InnoDB Buffer Pool size and settings are typically configured in your /etc/mysql/my.cnf file. Here you can set variables like:

innodb-buffer-pool-size = 256M
innodb_io_capacity = 3000
innodb_io_capacity_max = 5000

…And more! There’s a whole host of settings you can configure for your InnoDB Buffer Pool in the MySQL documentation. General guidelines for configuring the pool settings: Ensure it’s smaller than the total amount of Memory on your server, and ensure it’s larger or the same size as the database(s) on your server. From there you can perform testing on your website while fine tuning the settings to see which size is most effective for performance. 


Have any comments or questions? Experience to share regarding the InnoDB Buffer Pool? Let me know in the comments, or Contact Me. 
Troubleshooting with ngrep

If you’ve ever wanted to monitor and filter through network traffic in realtime, ngrep is about to be your new best friend. 

ngrep stands for “network grep” and can be a very useful tool for packet sniffing, troubleshooting, and more. It’s like standard GNU grep (which I talk about a lot in my parsing logs article) but for the network layer. That means you can use regex (or regular expressions) to filter and parse through active network connections. Check out some common examples in the ngrep documentation here. In the following sections we’ll explore what packet sniffing is and why it might be useful to you.

What is packet sniffing?

In short, packet sniffing allows you to inspect the data within each network packet transmitted through your network. Packet sniffing is very useful when troubleshooting network connections. It can show you information like the size of packet data sent and received, headers, set cookies and cookie values, and even *yikes* if sent over HTTP (unencrypted), form data including site login details. 

Packet sniffing helps you do a lot of detective work specifically around what is sent over the network. This means it can help you troubleshoot everything from bandwidth usage spikes to identifying network security issues. 

That being said, packet sniffers can also be used by hackers and users with malicious intentions to “listen in” on your network. This is one reason why HTTPS is so important–it encrypts the data being transmitted between the web browser and the web server for your site. 

Using ngrep to packet sniff

Now let’s dive into some usage examples of ngrep. Please note, in order to use ngrep you will need to be using a compatible operating system (Linux and Mac OS X are both supported), and you will need root access on your server. 

Start by connecting to your server via SSH and entering a sudo screen. If you’re not familiar, you can open a sudo screen with the following command, provided you have the right access level:

sudo screen -S SCREENNAME

Once you’re logged into your screen, start simple by watching any traffic crossing port 80 (HTTP traffic is processed by this port):

ngrep -d any port 80

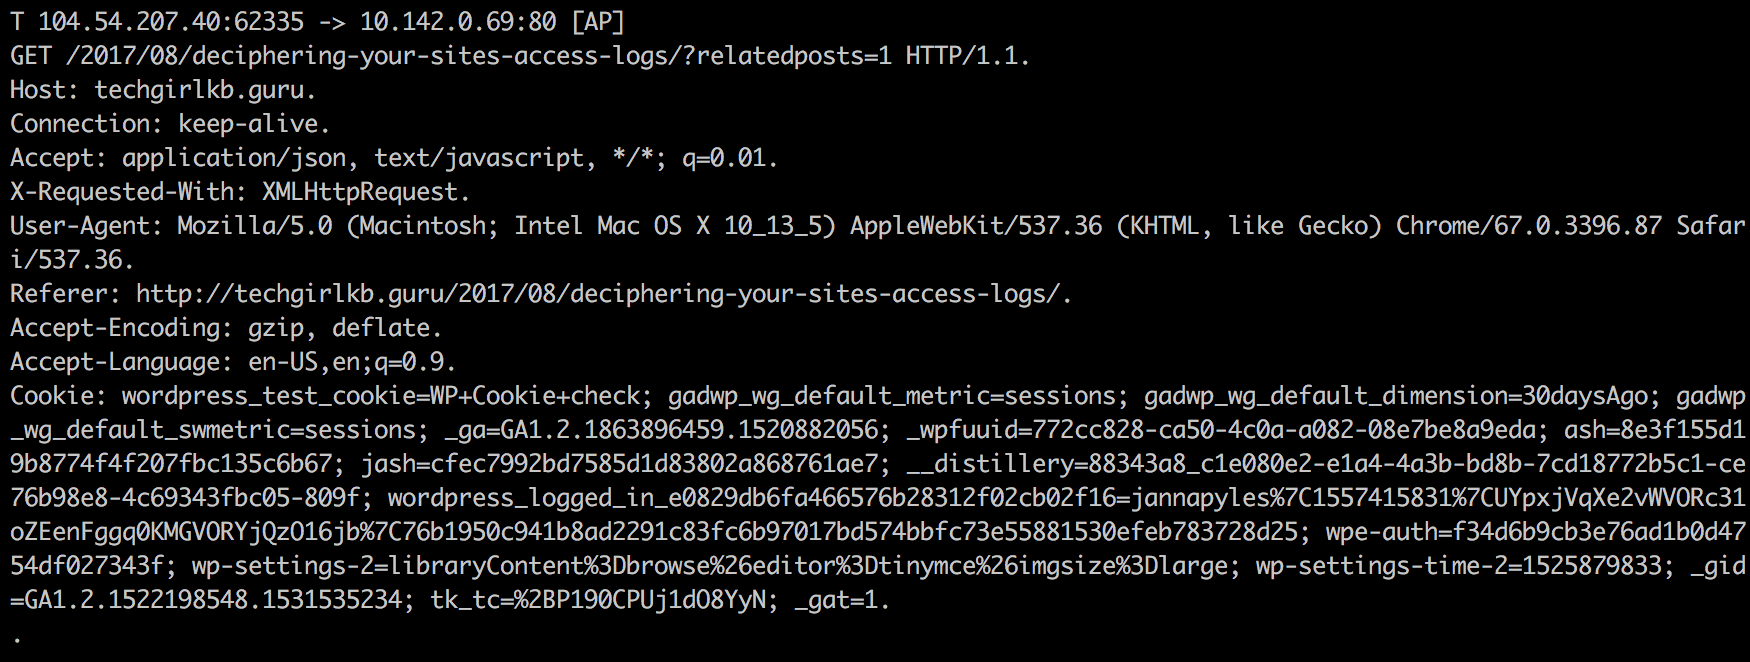
You’ll notice some information flowing across the screen (providing the server is receiving some traffic on port 80 currently), but a lot of it will be super unhelpful junk like this:

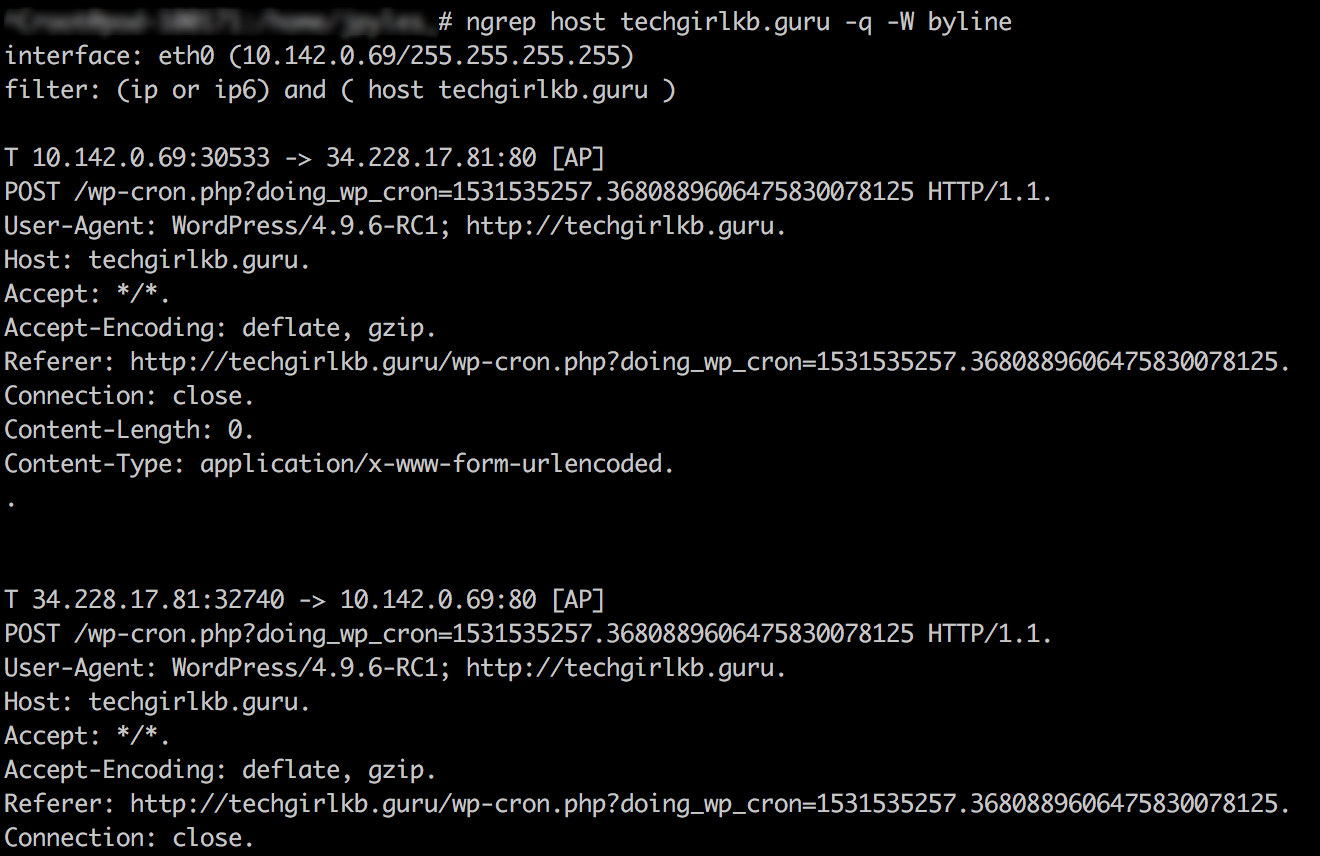
In order to get actually useful information we’ll need to filter the results. Let’s try separating it out with “-W byline” instead, and filter for only results that include “GET /” on port 80.

ngrep -q -W byline -i "GET /" port 80

This should yield some more readable results. You should now see lines for headers, remote IP addresses, and set cookies. 

Using this same syntax you can grep for more things, like for example:

ngrep -q -W byline -i "POST /wp-login.php" port 80

Be aware, the command above will show any username and passwords sent from the browser to the web server in plain text. However, if you are using SSL/TLS encryption to serve your website via HTTPS instead, this information will be sent over port 443 instead and will be encrypted. A great example of why SSL is so important!

ngrep options

Once you learn the basics like the examples above, you can experiment with the optional flags available with ngrep. Below are some examples of interesting and helpful flags available, though you can find the full list on the MAN page. 

-e – show empty packets as well. Normally these are discarded.

-W normal|byline|single|none – specify how you’d like to see the packet data. “Byline” is perhaps most useful in that it allows you to view the data mostly without wrapped content, making the packet entries more easily readable, 

-O – dump the output to a file

-q – quiet mode. Only outputs the headers and related payloads.

-i – ignore case (matches UPPERCASE, lowercase, or MiXeD).

-n num – match only num number of packets before exiting.

-v – invert and instead show only things that DON’T match your regex.

host host - specify the hostname or IP address to filter for.

-I pcap_dump – use a file named “pcap_dump” as input for ngrep.

In conclusion

Ngrep can help is a helpful tool for monitoring and filtering packets of data sent over the network. I hope this guide has helped you learn more about ngrep! Have any favorite ngrep commands you use, use cases to share, or questions? Let me know in the comments, or contact me!

I/O, IOWait, and MySQL

Memory can be a fickle, difficult thing to measure. When it comes to server performance, Memory usage data can be misleading. Processes tend to indicate they are using the full amount of Memory allocated to them when viewing server status in tools like htop. In truth, one of the only health indicators for Memory is swap usage. In this article we will explain swap, Memory usage, IOWait, and common issues with Memory.

Web Server Memory

On a web server, Memory is allocated to the various services on your serve: Apache, Nginx, MySQL, and so on. These processes tend to “hold on” to the memory allocated to them. So much so, it can be nearly impossible to determine how much Memory a process is actively using. On web servers, the files requested by services are in cached Memory (RAM) for easy access. Even when files are not actively being used, the Memory holding the files still looks as though it is being utilized. When a file is always being written or read, it is much faster and efficient for the system to store the file in cached Memory.

Measuring Memory usage with the “free” command

In Linux you can use the free command to easily show how much Memory is being utilized. I like to use the -h flag as well, to more easily read the results. This command will show where your Memory is being utilized: total, free, used, cache, and buffers.

Perhaps most importantly, the free command will indicate whether or not you are writing to swap.

Swap

In a web server environment, when a service over-utilizes the allocated Memory, it will begin to write to swap. This means the web server is writing to disk space as a supplement for Memory. Writing to swap is slow and inefficient, causing the CPU to have to wait while the Memory pages are being written to disk. The most obvious warning flag for Memory concern is swap usage. Writing to swap is a clear indicator that Memory is being overused in some capacity. You can measure swap usage using the free command described above. However, it may be more useful to look at a live monitor of usage like htop instead.

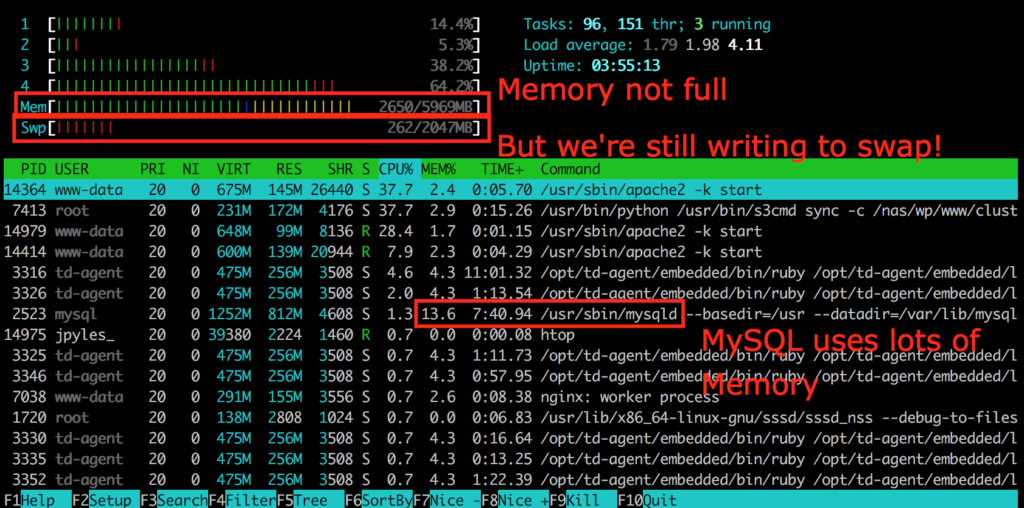
htop will show whether Memory as a whole on a web server is being over-utilized, or whether a specific service is over-utilizing its allocated Memory. A good indicator is to look at the total Memory row compared to the swap row. If Memory is not fully utilized but there is still swap usage, this indicates a single service is abusing Memory.

Why is writing to swap slow?

So why would writing to swap be slow, while writing to Memory (RAM) is not? I think this article sums it up best. But basically, there’s a certain amount of latency involved in rotating the disk to the correct storage point. During this time, the CPU (processor) is idle, making for IOWait.

I/O and IOWait

Any read/write process, including writing and reading pages from Memory, is an I/O process. I/O stands for input/output, but for the purposes of this article you can consider I/O to be read and write operations. Writing and reading pages to and from Memory tends to take a few milliseconds. However, writing and reading from swap is a different story. Because swap is disk space being used instead of Memory, the latency caused by rotating the disk to the correct location to access the correct information adds up to IOWait. IOWait is time the processor (CPU) spends waiting for I/O processes to complete.

IOWait can be problematic on its own, but the problem is compounded by IOPs rate limiting. Some datacenter providers have a low threshold for input/output operations. When the rate of I/O operations increases beyond this limitation, these operations are then throttled. This compounds our IOWait issue, because now the CPU must wait even longer for I/O processes to complete. If the throttling or Memory usage becomes too egregious, your data center might even have a trigger to automatically reboot the server.

MySQL and IOWait

In my experience with WordPress, the service that tends to use the most Memory is MySQL by far. This can be for a number of reasons. When a WordPress query accesses a MySQL database, the tables, rows, and indexes must be stored in Memory. Most modern servers have an allocation of Memory for MySQL called the InnoDB Buffer Pool. If this pool is overutilized, MySQL will begin to store those tables, rows, and indexes to swap instead. A common cause of Memory overutilization is extremely large database tables. If these large tables are used often, they will need to be stored in Memory. If your InnoDB Buffer Pool is smaller than your large table, MySQL will write this data to swap instead.

Most often when troubleshooting Memory issues, I find the cause to be unoptimized databases. By ensuring the proper storage engine and reducing database bloat, many Memory and IOWait issues can be avoided from the start. If your database cannot be optimized further, it’s time to optimize your InnoDB Buffer Pool or server hardware instead. MySQL has a guide to optimizing InnoDB Disk I/O you can use for fine tuning.

Table storage engines

Another common MySQL issue happens when the MyISAM table storage engine is used. MyISAM tables cannot use the InnoDB Buffer Pool as they do not use the InnoDB storage engine. Instead, MyISAM uses a key buffer for storing indexes directly from disk cache. As aforementioned, disk cache is not nearly as performant as Memory. And, reading and writing from disk cache is an I/O operation that can easily cause IOWait.

Beyond the performance implications from not using the InnoDB Buffer Pool, MyISAM is not as ideal for databases on production websites that are frequently writing data to tables. MyISAM will lock an entire table while a write operation is updating or adding a row. This means any other requests or MySQL connections attempting to update the table at the same time might experience errors or delays. By contrast, InnoDB allows row-level locking. With a WordPress website, transients, settings, posts, comments and more data are frequently updating the database. This makes the InnoDB table storage engine much more optimal for WordPress websites.

Partitions and Drives

One way hosting providers have found to avoid IOWait issues is to separate MySQL into its own partition or disk. While this does not necessarily remove the IOWait altogether, it logically separates the partition experiencing IOWait from the web server. This means the partition serving website traffic is not impacted beyond slow query performance in high IOWait conditions. For even faster performance, consider SSD for your MySQL partition. SSD, or Solid State Drives, use non-rotational storage known as “flash.” While the cost per GB of storage space is high with SSDs, they are far more performant in terms of IOPs.


How to make a PHP info file

If you’re using shared hosting for your WordPress site, there may come a time when you need to know what PHP version you’re running, as well as any extra modules installed or PHP limitations. You don’t have access to the server to check these things for yourself. Enter the PHP info file.

The PHP info file will give you information about the version of PHP and other software on the server. This in turn can help you know what you can and can’t do on the server. Without further ado, let’s dive into how to make one.

[geoip-content country=”DE”]Guten tag![/geoip-content][geoip-content country=”FR”]Bonjour![/geoip-content]

[geoip-content countrycode=”US” not_state=”TX”]Hello![/geoip-content]

Making a PHP Info File

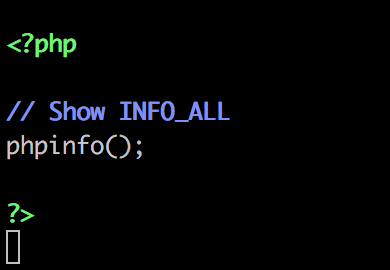
First, open a text editor capable of making a plain-text file. On Mac you can use TextEdit, and on Windows you can use Notepad. Enter the following text in a new file:

<?php
// Show INFO_ALL
phpinfo();
?>

Save your file as “phpinfo.php” on your computer.

Adding PHP Info File to your Server

Now that you’ve made your file, you’ll need to move it to the server where your website is hosted. The PHP info file should live in the document root, so that you can access it at “yourdomain.com/phpinfo.php” in your web browser. The easiest (and most widely-supported) way to do this would be to transfer the file using SFTP. Grab your SFTP or FTP credentials from your web host, and connect using FileZilla or another similar client.

Drag and drop the phpinfo.php file you saved on your computer over to the document root of your website:

Viewing PHP Info File

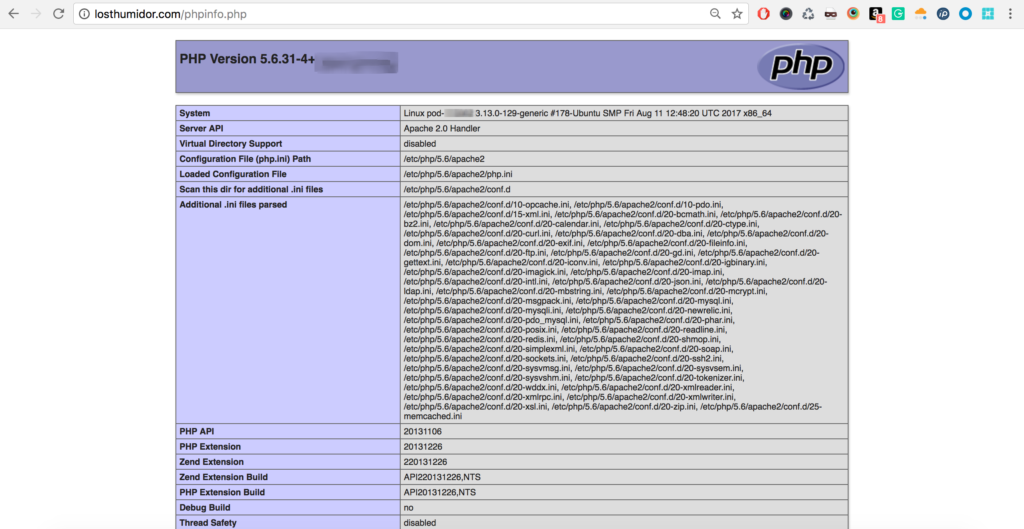
So you’ve now created the PHP info file, and transferred it up to your website. Now what? Now it’s time to view the actual information. Just go to “yourdomain.com/phpinfo.php” to view the contents.

And that’s it! You’ve created your phpinfo.php file from start to finish. When you’ve finished with the file it’s best to delete it from your site using SFTP simply for security purposes. If you have any comments, questions, things to add just let me know in the comments, or Contact Me.

Send email with Amazon SES on Google Cloud Hosting

The Google Cloud email dilemma

If you host your WordPress website on Google Cloud infrastructure, you’ve probably noticed you can’t send outgoing email through standard email ports on your server. Google allows only Google Apps to send email through ports 465 and 587, and prohibits any service from sending mail through port 25.

Many email providers have created better ways of sending or relaying email through alternate ports or APIs. But Microsoft Office 365 among others are left in the lurch when it comes to sending outgoing emails through Google Cloud servers. If you’re one of the many affected by this issue, this guide will help you configure email through Amazon Simple Email Service (SES) to send outgoing emails from your WordPress site. Many thanks to my friend Jay Hill for contributing these steps!

Set up SES DNS records

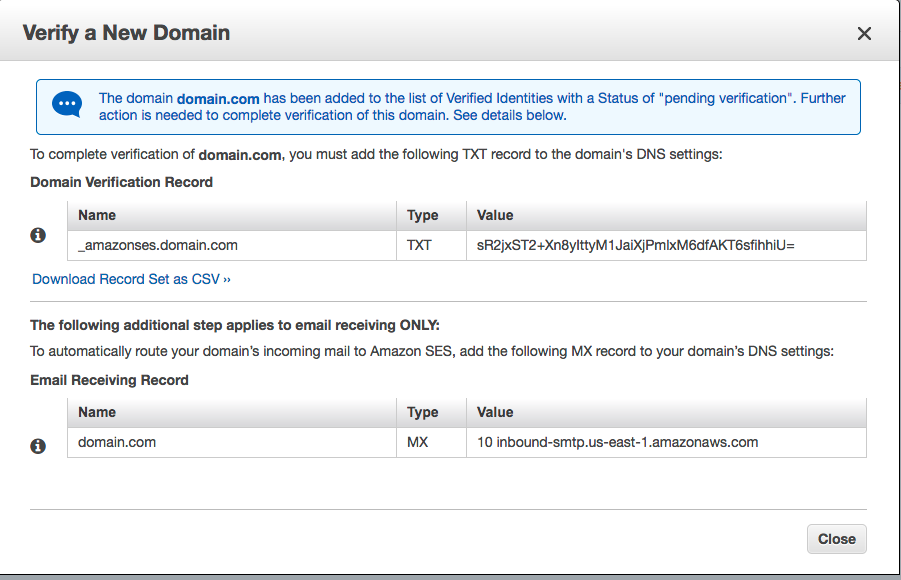
The first step is to validate your domain with the SES service–This requires adding DNS records with your DNS provider. The process is the same with any DNS provider, but we are using CloudFlare’s DNS dashboard in this example.

Log in to the Amazon Web Services console and navigate to the SES page. Then click “Domains” from the left-hand navigation menu. Click “Verify a new domain” and enter your domain name. If you want to utilize DKIM then you can also generate DKIM signatures in this step. On the next screen you’ll be given your DNS records to set up within your DNS provider.

You can take the Type and Value fields from these records and paste them directly into your DNS provider’s dashboard. In our CloudFlare example simply log in, choose your domain name, and select “DNS records.” In the dropdown menu to select a type of record, choose “TXT” – then in “Value” enter the “Name” field from the Domain Verification Record, and in the box next to it, enter the “Value” field. Once Amazon SES has been able to detect the records have been added, your domain is verified for use with their service.

If you utilize an email provider for your domain’s emails such as Google Suite, Outlook365, or another email server then you do not need to input the MX record and will leave your current MX records as is–this means only your outgoing emails will be handled by Amazon SES.

Create an SMTP user

Now that Amazon has been able to verify our domain for sending email we need to create an SMTP user for our WordPress site to use for sending email. On the SES console home page, click “SMTP Settings” from the left-hand navigation. Then click the “Create My SMTP Credentials” button. Leave the default username as-is and click “Create.”

On the next screen be sure to download your login credentials–we will need them in the next step. To do this, just click “Show User SMTP Security Credentials” and you can copy and paste them into your text editor of choice.

Install and configure SMTP plugin

Now that we’ve configured Amazon SES it’s time to configure your WordPress install to utilize the service. We’re going to be using the Easy WP SMTP plugin for this step. You can install this plugin by going to your plugins page in the WordPress Admin Dashboard of your site and going to Plugins > Add New > search for Easy WP SMTP > Install. Once installed you’ll want to activate the plugin so  we can configure it.

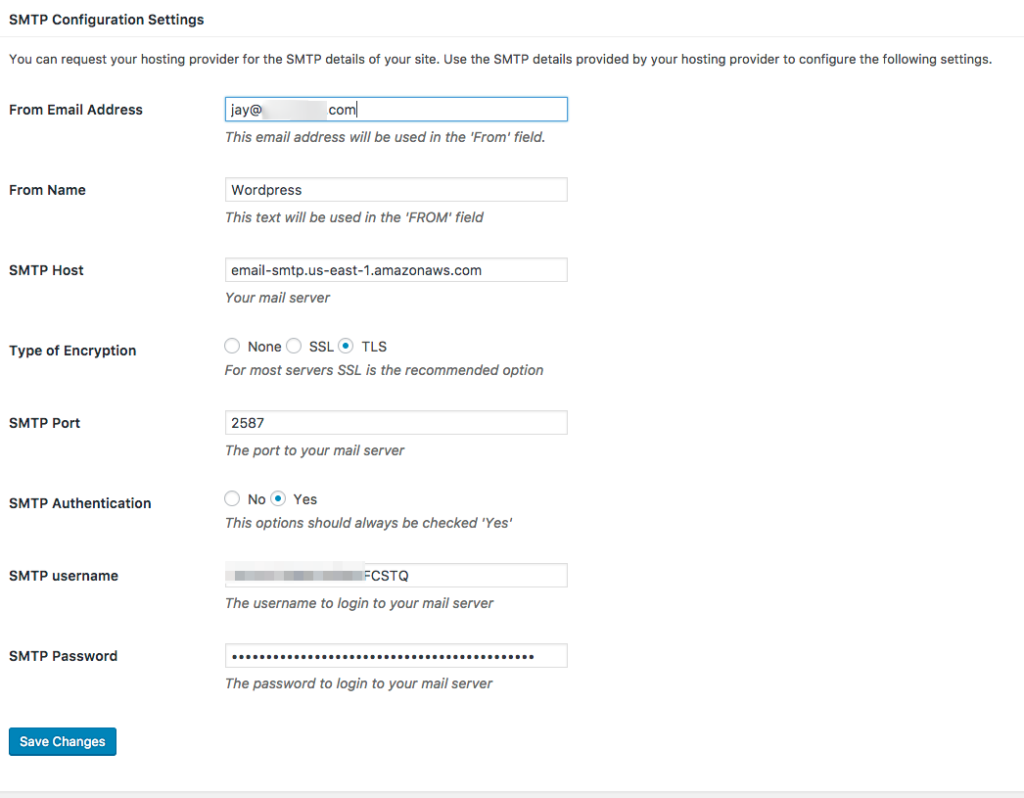
Google Cloud servers have ports 25, 465, and 587 disabled by default, but you can still use port 2587.

  • In the “From” field, put an email address you want WordPress to send email from. This could be anything as long as it has your domain name in it.
  • For the “Name” you can put anything you want your emails to show as from.
  • You can get your SMTP Host at the Amazon SES SMTP Settings page. If you setup SES in the US-East-1 region it will be: email-smtp.us-east-1.amazonaws.com.
  • Ensure that TLS is selected for the Type of Encryption setting.
  • For the sending port, input 2587.
  • Check the SMTP Authentication to yes and input your SMTP username and password that was created in the previous step.

Your settings should then look similar to this:


Send a test email

Now that your settings are configured, you’ll want to send a test email to make sure it’s working right. Right now your SES account is still in Sandbox mode, so we need to configure an email address to send email to first. In your Amazon SES console, click “Email Addresses.”

Click “Verify A New Email address,” enter in the email address you want to verify. Then click the “Verify This Email Address.” This will send an email to the specified email address. You’ll need to click the link within it to verify your email address. If you do not verify your email address, Amazon won’t send the email.

Once verified, head to the Easy WP SMTP Settings page in your dashboard and scroll down to the “Testing and Debugging Settings” section. Input the verified email address, a subject and message, and then send. Check your email to ensure that it was delivered. If it was not delivered, confirm your email address is validated and your port settings.

Request Amazon release Sandbox Mode

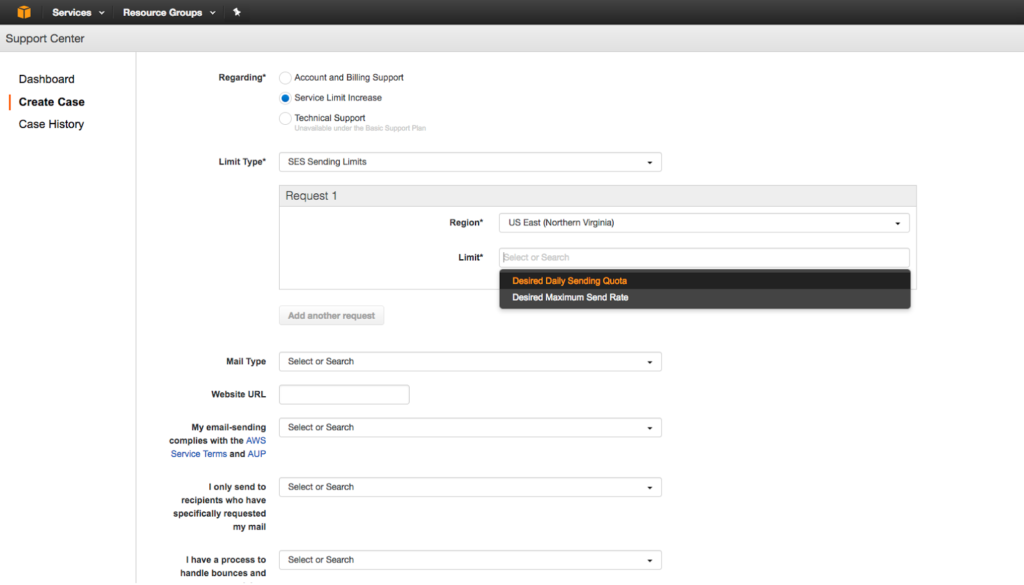
Amazon keeps your SES service in what is called Sandbox Mode which requires that all email addresses you send to be verified before email deliverability can be achieved. We need to request Amazon enable production access to SES by utilizing their support system for a Service Limit Increase.

Ensure “Service Limit Increase” is selected, and “Limit Type” is set for “SES Sending Limits.” In “Request 1” choose the region you setup SES for and then choose “SES Production Access.” Fill out the rest of the boxes and submit the request. Amazon typically takes 24 hours to grant access to Production Mode for SES.

Once they have taken SES out of Sandbox mode you should be able to test your site’s emails to ensure they’re delivering properly. Be sure to test any eCommerce emails, contact forms, or transactional emails. You should also ensure that your contact forms have a captcha configured. This ensures spammers are not able to abuse your forms, which in turn abuses your SES service.


And that’s it! You’ve successfully configured Amazon SES to send your outgoing emails from WordPress. Have any additional thoughts to add, concerns, comments? Add a comment, or Contact Me.

How to download your images held hostage by Photobucket

Why download your Photobucket images?

Earlier this year, Photobucket changed their Terms and Conditions fairly silently, to prevent linking of images on their service on 3rd party websites for free. Instead, users who had posted Photobucket links to their images on another website saw this ugly prompt to upgrade their account.

Photobucket had already done this for users when they reached a very high bandwidth usage, but previously an upgrade was only $25. Now the ability to hotlink your images from Photobucket comes with a steep $400/year price tag. Many users called it extortion and blackmail. Especially because users soon discovered the interface to download their images to then post them from their own website was broken. And, the option to upload an image in a support ticket with Photobucket was broken too. This left many users in a panic. There simply was no way to get their site working again.

Luckily, if you’re familiar with Terminal and Bash, there’s a pretty easy way to get your images back. Philip Jewell posted helpful steps on Github as well as images to help guide the way.

Get the Image Links

First, log into your Photobucket account and select the album of images you need (this process goes one album at a time). Choose an image or two in the album and a “Select all” box appears. Choose “Select all” and wait for your count of images in the bottom to update before continuing. Now navigate to the next album you’d like to download and repeat the process. Do this for all albums you need to download. Through this process your total images selected should continue to grow. When you’re finished, click “Link” at the bottom of your screen.

Photobucket will open a window containing all the direct links for your images in it. Clicking will copy the links to your clipboard.

From here, create a folder on your desktop called “photobucket.” Then open a text editor on your computer and paste your image links into it. Save it as a TXT file (e.g. my_photobucket_files.txt) to your “photobucket” folder on your desktop.

Now you are ready to download the files.

Please note: the following instructions are for users on Mac OS X. If you are using a Windows machine, users have provided solutions in the comments of Philip Jewell’s post on Github: https://gist.github.com/philipjewell/a9e1eae2d999a2529a08c15b06deb13d

Download your images

Now the fun part: downloading your images from Photobucket. In your Terminal application, paste the following commands:

cd ~/Desktop/photobucket
cut -d\/ -f 7 photobucket_files.txt | grep "\." | while read file; do grep "${file}$" photobucket_files.txt; done | while read file; do curl -O --referer "http://s.photobucket.com/" ${file}; done
cut -d\/ -f 7 photobucket_files.txt | grep -v "\." | sort -u | while read dir; do mkdir ${dir}; cd ${dir}; grep "/${dir}/" ../photobucket_files.txt | while read file; do curl -O --referer "http://s.photobucket.com/" ${file}; done; cd -; done

What is this command doing? It’s looping through all your images to download them, and using “http://s.photobucket.com/” as a referer. This tricks Photobucket into thinking the requests are coming from itself. This allows you to easily download your images you need without dealing with their buggy and ad-ridden interface, or dealing with their upgrade messaging.

Some users have also suggested using sed to take out IMG tags as well:

sed -i 's/\[IMG]//g; s/\[\/IMG]//g' photobucket_files.txt


That’s all there is to it! Hopefully this guide has helped you download your images so they can be uploaded directly to your site, store, forum, or wherever they were needed. Have any comments, questions, or notes to add? Let me know in the comments, or Contact Me.
  • « Previous Page
  • Page 1
  • Page 2
  • Page 3
  • Page 4
  • Page 5
  • …
  • Page 8
  • Next Page »

Footer

Categories

  • Ansible
  • AWS
  • Git
  • Linux
  • Optimization
  • Performance
  • PHP
  • Scalability
  • Security
  • Uncategorized
  • WordPress

Copyright © 2025 · Atmosphere Pro on Genesis Framework · WordPress · Log in