• Skip to main content
  • Skip to footer

TechGirlKB

Performance | Scalability | WordPress | Linux | Insights

  • Home
  • Speaking
  • Posts
    • Linux
    • Performance
    • Optimization
    • WordPress
    • Security
    • Scalability
  • About Janna Hilferty
  • Contact Me

Posts

Troubleshooting Broken Proxies

If you’re using a performance-optimized server ecosystem, there’s a good chance that you’re using at least one proxy relationship. Whether the proxy is from another server or firewall, or from one web server to another within the same environment, broken proxies can sometimes be nebulous to troubleshoot.

Today we’ll look specifically at the Nginx and Apache proxy relationship, when using both web servers. Curious about the benefits of using Nginx, Apache, or both? Check out the Web Server Showdown.

What is a proxy?

Before we dive in too far, let’s examine: what is a proxy? A proxy, sometimes referred to as an “application gateway,” is a web server that acts as an intermediary to another web server or service. In our example Nginx functions as a proxy server, passing requests to your caching mechanism or to Apache. Apache processes the request, passing it back to Nginx. Nginx in turn passes it to the original requestor.

What is a broken proxy?

Now that we understand the proxy, we can answer the question: what is a broken proxy? A broken proxy refers to when the intermediary service passes a request, but doesn’t get it back. So in our example, Nginx passes the request to Apache. Something happens at the Apache-level to where the request is now gone. Apache now has nothing to hand back to Nginx.

Nginx however is still responsible to the original requestor to tell them… something! It responds by telling the original requestor that it had a bad gateway (proxy) with a 502 or 504 HTTP Response.

Troubleshooting broken proxies

A common problem with proxies is that they can be difficult to troubleshoot. How do you know which service did not respond to the request Nginx (the proxy server) sent? And how do you know why the service did not complete the request?

A good place to start is your logs. Your Nginx error logs will indicate when an upstream error occurred, and may help offer some context, such as the port the request was sent to. These logs will usually be in the log path on your server (/var/log/nginx/ for many), labeled error.log.

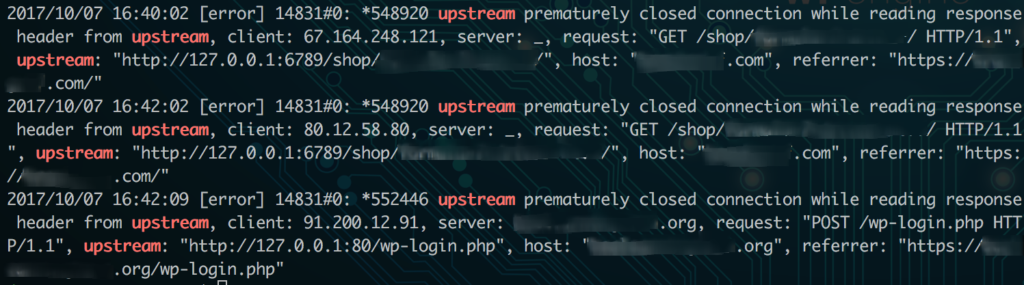
Your Nginx error log files will usually show which port produced the upstream error, which is your first clue. In my example, I can look for which service is running on that port. If I know Apache or my caching mechanism is operating on that port, I can know that service is responsible for the error.

6789 in the example in the picture was my Apache service, so I know Apache did not fulfill the request. Now I can check my Apache error logs for more information. These error logs are also generally where your logs are stored on the server, like /var/log/apache2/error.log. If you have multiple sites on the same server, you may have each site’s errors logged in separate files here instead.

Some common reasons Apache might not complete a request:

  • The request timed out (max_execution_time reached)
  • The request used too much Memory and was killed
  • A segmentation fault occurred
  • The Apache service is not on or currently restarting

Many times your Apache error logs will let you know if the above is causing the issue. If it doesn’t, you may need to consult your firewall or security services on the server to see if the requests were blocked for other security reasons.

Caveats

Keep in mind: even if Apache experiences errors (like a 500 error due to theme or plugin code), as long as Apache entirely processes the request it will simply pass this HTTP status code up to Nginx to serve to your users. So remember, 502 errors will typically only result if there is no response from Apache back to Nginx.

And also remember that broken proxies are not always within the same server environment. If you use a firewall or full site CDN service, the requests are proxied through these external servers as well. If you experience a 502 error and can’t find that request in your access logs, looking to the logs on your external firewall should be your next step.


Have you experienced issues with 502 errors on your server? What was the cause? Have any other solutions or recommendations to include? Let me know in the comments, or Contact Me.


Installing Varnish on Ubuntu

In a few of my posts I’ve talked about the benefits of page cache systems like Varnish. Today we’ll demonstrate how to install it! Before continuing, be aware that this guide assumes you’re using Ubuntu on your server.

Why use Varnish?

Firstly, let’s talk about why page cache is fantastic. For dynamic page generation languages like PHP, the amount of server processing power it takes to build a page compared to serving a static file (like HTML) is substantially more. Since the page has to be rebuilt with each new user to request it, the server does a lot of redundant work. But this also allows for more customization to your users since you can tell the server to build the page differently based on different conditions (geolocation, referrer, device, campaign, etc).

That being said, using persistent page cache is an easy way to get the best of both worlds: cache holds onto a static copy of the page that was generated for a period of time, and then the page can be built as new whenever the cache expires. In short, page cache allows your pages to load in a few milliseconds rather than 1+ full seconds.

Installing Varnish

To install Varnish on a system using Ubuntu, you’ll use the package installer. While logged into your server (as a non-root user), run the following:

sudo apt install varnish

Be sure the Varnish service is stopped while you configure it! You can stop the Varnish service like this:

sudo systemctl stop varnish

Now it’s time to configure the Varnish settings. Make a copy of the default configuration file like so:

cd /etc/varnish
sudo cp default.vcl mycustom.vcl

Make sure Varnish is configured for the right port (we want port 80 by default) and the right file (our mycustom.vcl file):

sudo nano /etc/default/varnish
DAEMON_OPTS="-a :80 \
-T localhost:6082 \
-f /etc/varnish/mycustom.vcl \
-S /etc/varnish/secret \
-s malloc,256m"

Configuring Varnish

The top of your mycustom.vcl file should read like this by default:

backend default {
.host = "127.0.0.1";
.port = "8080";
}

This line defines the “backend,” or which port to which Varnish should pass uncached requests. Now we want to configure the web server to listen on the right port. Nginx will listen on port 8080 by default, but if you’re using Apache you may need to modify the port in your /etc/apache2/ports.conf file and /etc/apache2/sites-enabled/000-default.conf to reference port 8080.

From here you can begin to customize your configuration! You can tell Varnish what requests to add X-Group headers for, which pages to strip out cookies on, how and when to purge the cache, and more. You probably only want to cache GET and HEAD methods for requests, as POST requests should always be uncached. Here’s a basic rule that says to add a header saying not to cache anything that’s not GET and HEAD:

sub vcl_recv {
if (req.request != "GET" && req.request != "HEAD") {
set req.http.X-Pass-Method = req.request;
return (pass);
}
}

And here’s an excerpt which says not to cache anything with the path “wp-admin” (a common need for sites with WordPress):

sub vcl_recv
{
if (req.http.host == "mysite.com" &&
req.url ~ "^/wp-admin")
{
return (pass);
}
}

There’s a ton of other fun custom configurations you can add. To research the available options and experiment with them, check out the book from Varnish.

Once you’ve added in your customizations, be sure to start Varnish:

sudo systemctl start varnish

Now what?

Now you have Varnish installed and configured! Your site will cache pages and purge the cache based on the settings you’ve configured in the mycustom.vcl file. Using cache and caching heavily will heavily benefit your site performance. And, it’ll help your site scale to support more traffic at a time. Enjoy!


Have more questions about Varnish? Confused about how cache works? Any cool cache rules you use in your own environment? Let me know in the comments or contact me.

5 Winning WordPress Search Solutions

The Problem

If you’ve designed many WordPress sites, you may have noticed something: The default search function in WordPress… well… it sucks. It seriously does. If you’re unaware, allow me to enlighten you.

Firstly, the search by default only searches the title, content, and excerpt of default pages and posts on your site. Why does this suck? Because your users probably want to find things that are referenced in Custom Post Types. This includes WooCommerce orders, forums, and anything else you’ve separated to its own specific type of “post.”

The default WordPress search function also doesn’t intuitively understand searches in quotations (“phrase search”), or sort the results by how relevant they are to the term searched.

And, the default WordPress search uses a super ugly query. Here’s the results on my own default search when I searched for the word “tech” on my site:

As a performance expert, this query makes me cringe. These queries are very unoptimized! And they don’t scale well with highly-trafficked sites. Multiple people running searches on your site at once, especially ones with high post counts, will slow your site down to a crawl.

The Solution

So if WordPress search sucks, what is the best option for your site? I’m glad to explain. Firstly, if there’s any way for you to offload the searches to an external service, this will make your site much more “lightweight” on the server. This way, your queries can run on an external service specifically designed for sorting and searching! In this section I’ll explain some of the best options I’ve seen.

Algolia Search

Algolia is a third party integration you can use with WordPress. With this system, your searches happen “offsite,” on Algolia’s servers. It returns your results lightning fast. Here’s a comparison of using WordPress default search, to Algolia’s external query system, on a site with thousands of events:

Default WP search:

Algolia search:

Algolia clearly takes the cake here, returning results in .5 seconds compared to nearly 8 seconds. Not only is it fast, offloading searches to external servers optimized for query performance helps reduce the amount of work your server has to do to serve your pages. This means your site will support more concurrent traffic and more concurrent searches!

Lift: Search for WordPress

The Lift plugin offers similar benefits to Algolia in that it offers an offsite option for searching. This plugin specifically uses Amazon CloudSearch services to support your offsite searches. The major downside to this plugin is that it hasn’t been actively maintained: it hasn’t been updated in over two years. Here’s a cool diagram of how it works:

source: colorlib.com

While this plugin hasn’t been updated in quite a while, it works seamlessly with most plugins and themes, offers its own search widget, and can even search media uploads. WP Beginner has a great setup guide for help getting started.

ElasticPress

ElasticPress is a WordPress plugin which drastically improves searches by building massive indexes of your content. Not only does it integrate well with other post types, it allows for faster and more efficient searches to display related content. This plugin requires you to have ElasticSearch installed on a host. This can be the server your site resides on (if your host allows), your own computer, a separate set of servers, or using Elastic Cloud to host it on AWS using ElasticSearch’s own service. To manage your indexes, you’ll want to use WP CLI.

ElasticPress can sometimes be nebulous to set up, depending on your configuration and where ElasticSearch is actually installed. But the performance benefits are well worth the trouble. According to pressjitsu, “An orders list page that took as much as 80 seconds to load loaded in under 4 seconds” – and that’s just one example! This system can take massive, ugly search queries and crunch them in a far more performant environment geared specifically towards searching.

Other options

There are some other free, on-server options for search plugins. These plugins will offer more options for searching intuitively, but will not offer the performance benefits of the ones mentioned above.

Relevanssi

Relevanssi is what some in the business call a “Freemium” plugin. The base plugin is free, but has premium upgrades that can be purchased. Out of the box, the free features include:

  • Searching with quotes for “exact phrases” – this is how many search engines (like Google) search, so this is an intuitive win for your users.
  • Indexes custom post types – a big win for searching your products or other
  • “Fuzzy search” – this means if users type part of a word, or end up searching with a typo, the search results still bring up relevant items.
  • Highlights the search term(s) in the content returned – this is a win because it shows customers why specific content came up for their search term, and helps them determine if the result is what they need.
  • Shows results based on how relevant or closely matched they are, rather than just how recently they were published.

The premium version of Relevanssi includes:

  • Multisite support
  • Assign “weight” to posts so “heavier” ones show up more or higher in results
  • Ability to import/export settings

Why I don’t recommend Relevanssi at the top of my list: it’s made to be used with 10,000 posts or less. The more posts you have, the less performant it is. This is because it still uses MySQL to search in your site’s own database, which can weigh down your site and the server it resides on. Still, it offers more options for searching than many! It is a viable option if you have low traffic and fewer than 10,000 posts.

SearchWP

SearchWP claims to be the best search plugin out there. It certainly offers a lot of features, either way. Out of the box, it can search: PDFs, products and their description, shortcode data, terms and taxonomy data, and custom field data. That’s a pretty comprehensive list!

Above you can see some of the nice customizable settings like weight, excluding options, custom fields, and how to easily check/uncheck items to include.

However, SearchWP comes with a BIG asterisk from me. SearchWP will create giant tables in your database. Your database should be trim to perform well. You want to be sure the size of your databases fit within your Memory buffer pool for MySQL processes to ensure proper performance. Be absolutely certain you have enough server resources to support the amount of data stored by SearchWP!


These solutions are the only ones I would truly recommend for sites. There certainly are others available, but they work using AJAX which can easily overwhelm your server and slow down your site. Or, they use equally ugly queries to find the search terms.

As a rule of thumb, I absolutely recommend an offsite option specifically optimized for searches. If this simply isn’t an option, be sure to use a plugin solution that offers the range of features you need without weighing down your database too much.

Is there a search solution you like on your own site? Is there an important option I left off? Let me know in the comments, or contact me.


WordPress Doesn’t Use PHP Sessions, and Neither Should You

What are PHP Sessions?

PHP Sessions are a type of cookie, meant to store or track data about a user on your site. For instance, a shopping cart total, or recommended articles might gather this kind of data. If a site is using PHP Sessions, you’ll be able to see them by opening your Chrome Inspector. Right-click the page and choose “Inspect Element”. Then select “Application” and expand the “Cookies” section. Below is an example of a site which is using PHP Sessions:

What’s wrong with PHP Sessions?

There are a number of reasons sites should not use PHP Sessions. Firstly, let’s discuss the security implications:

  • PHP Sessions can easily be exploited by attackers. All an attacker needs to know is the Session ID Value, and they can effectively “pick up” where another user “left off”. They can obtain personal information about the user or manipulate their session.
  • PHP Sessions store Session data as temporary files on the server itself, under the /tmp directory. This is particularly insecure on shared hosting environments. Since any site would have equal access to store files in /tmp, it would be relatively easy for an attacker to write a script to read and exploit these files.

So we can see PHP Sessions are not exactly the most secure way to protect the identity of the users on the site. Not only this, but PHP Sessions also carry performance implications. By nature, since each session carries a unique identifier, each new user’s requests would effectively “bust cache” in any page caching system. This system simply won’t scale with more concurrent traffic! Page cache is integral to keeping your site up and running no matter the amount of traffic you receive. If your site relies on PHP Sessions, you’re essentially negating any benefits for those users.

So I can’t track user behavior on my site?

False! You absolutely can. There are certainly more secure ways to store session data, and ways that will work better within cache. For example, WooCommerce and other eCommerce solutions for WordPress store session data in the database using a transient session value. This takes away the security risk of the temporary files stored with $_SESSION cookies. WordPress themselves choose to track logged-in users and other sessions with cookies of other names and values. So it is definitely possible to achieve what you want using more secure cookies.

I’m already using PHP Sessions. What now?

I’d recommend searching your site’s content to ensure you don’t have any plugins that are setting a “$_SESSION” cookie. If you find one, take a step back and look critically at the plugin. Is this plugin up to date? If not, update it! Is it integral to the way your site functions? If not, delete it! And if the plugin is integral, look out for replacement plugins that offer similar functionality for your site.

If the plugin itself is irreplaceable and is up to date, your next step should be asking the plugin developer what their plan is. Why does it use $_SESSION cookies? Are they planning on switching to a more secure method soon? The harsh reality is, due to the insecure nature of PHP Sessions, many WordPress hosts don’t support them at all.

As a last resort, if your host supports it you may want to check out the Native PHP Sessions plugin from Pantheon. Be sure to check with your host if this plugin is allowed and supported in their environment!

Continuous Integration vs Continuous Delivery

Introduction to Automation

A common principle in modern development is that you should use a version control system to manage code. This principle is especially important when working with a team of developers. Version control will allow your team to label their changes, merge code with others, and manage multiple codebases intuitively. Continuous integration and Continuous delivery are systems which help automate version control. In these systems each developer’s code is merged daily or at frequent intervals, and is tested against builds. In this way, code is frequently checked to prevent conflicts and errors at an early stage.

Continuous Integration

The ideology of Continuous Integration (CI) is simple: commit early, commit often. In its early stages, CI also involved unit testing to be run on each developer’s local machine. In more modern implementations, build servers are used instead.

Continuous Integration can mean either integrating changes to the main codebase several times daily, or “frequently” depending on the size of the project. For smaller subtasks the code would be integrated several times daily, whereas with larger projects, a more appropriate term might be “frequent integration.” Ideally in Continuous Integration, projects are broken up into tasks that would take no more than a day’s time to complete. This way, code can be integrated at least once per day.

Continuous Delivery

The concept behind Continuous Delivery (CD) is simply the process of continually releasing code into production from your main codebase. Continuous Integration allows different developers within different projects to code changes, automatically test against builds, and integrate them into the codebase. Then, Continuous Delivery is the process of deploying groups of those codebase changes into production together. This is the basis of Agile Development:

Our highest priority is to satisfy the customer through early and continuous delivery of valuable software.

By continuously integrating, this allows developers across the company to strategically group code releases together and continually release features. Before the Agile Development strategy, development teams were faced with massive combinations of code, producing unexpected conflicts and causing what some called “integration hell” while developers integrated code for hours or days at a time for larger, more spread out releases.

Why Use Agile Methods?

Most companies who choose to use Agile methods to deliver code have some major pain points:

  • Updating code was nebulous and difficult to manage.
  • Developer code was often blocked by other releases, who were potentially waiting on others in a vicious cycle.
  • Integrating code for a large release produced blockers and errors.
  • Automated testing wasn’t happening until hours or days of work were already invested in bad code.
  • End users were experiencing a slow turnaround for issue resolution or new features.

With Agile methodology, releases are constant. Developers “check out” a piece of code from the “codebase” library. They make the needed changes, and “check in” the code to the library again. Before the code is accepted to the library, it’s checked against automated build tests. In this way, developers are receiving a continuous feedback loop. And code is checked right away for errors! Less time is wasted, and more work is done.

Help! There’s so many options!

Yes, there are a lot of tools out there to help automate your workflow. It can be difficult to choose which is right for your team! One of my favorite resources to use when choosing a new company or tool is G2 Crowd. G2 ranks companies as: Niche, Contenders, High Performers, and Leaders. Check out their Continuous Integration findings.

Before choosing the tool you wish to use, be sure to look at how G2 defines these quadrants:

  • “Niche” tools are not as widely adopted, or may be very new. They have good reviews so far, but not enough volume of usability ratings to know if they are a valid option for everyone.
  • “Contenders” are widely-used, but don’t have great usability ratings.
  • “High Performers” don’t have a huge base of users, but of those users, they received a high satisfaction rating.
  • Last, “Leaders” both have the largest market share of users, and have highest marks for user satisfaction.

Which tool you ultimately choose will highly depend on your business needs, budget, and team size. Be sure to thoroughly research the available options! G2 also allows you to compare software side-by-side if needed:


How did you choose the software your team uses? What are the benefits and disadvantages? Let me know in the comments, or contact me.

Preventing Site Mirroring via Hotlinking

Introduction

If you’re a content manager for a site, chances are one of your worst nightmares is having another site completely mirror your own, effectively “stealing” your site’s SEO. Site mirroring is the concept of showing the exact same content and styles as another site. And unfortunately, it’s super easy for someone to do.

How is it done?

Site mirroring can be accomplished by using a combination of “static hotlinking” and some simple PHP code. Here’s an example:

Original site:

site mirroring


Mirrored site:

site mirroring


The sites look (almost) exactly the same! The developer on the mirrored site used this code to mirror the content:

<?php
//get site content
        $my_site = $_SERVER['HTTP_HOST'];
        $request_url = 'http://philipjewell.com' . $_SERVER['REQUEST_URI'];
        $ch = curl_init();
        curl_setopt($ch, CURLOPT_URL, $request_url);
        curl_setopt($ch, CURLOPT_FOLLOWLOCATION, true);
        curl_setopt($ch, CURLOPT_RETURNTRANSFER, TRUE);
        $site_content = curl_exec($ch); //get the contents of the site from this server by curling it
        //get all the href links and replace them with our domain so they don't navigate away
        $site_content = preg_replace('/href=(\'|\")https?:\/\/(www\.)?philipjewell.com/', 'href=\1https://'.$my_site, $site_content);
        $site_content = preg_replace('/Philip Jewell Designs/', 'What A Jerk Designs', $site_content);
        echo $site_content;
?>

Unfortunately it’s super simple with just tiny bits of code to mirror a site. But, luckily there are some easy ways to protect your site against this kind of issue.

Prevent Site Mirroring

There are a few key steps you can take on your site to prevent site mirroring. In this section we’ll cover several prevention method options for both Nginx and Apache web servers.

Disable hotlinking

The first and most simple is to prevent static hotlinking. This essentially means preventing other domains from referencing static files (like images) from your site on their own. If you host your site with WP Engine, simply contact support via chat to have them disable this for you. If you host elsewhere, you can use the below examples to see how to disable static hotlinking in Nginx and Apache. Both links provide more context into what each set of rules does for further information.

Nginx (goes in your Nginx config file)

location ~* \.(gif|png|jpe?g)$ {
expires 7d;
add_header Pragma public;
add_header Cache-Control "public, must-revalidate, proxy-revalidate";
# prevent hotlink
valid_referers none blocked ~.google. ~.bing. ~.yahoo. server_names ~($host);
if ($invalid_referer) {
rewrite (.*) /static/images/hotlink-denied.jpg redirect;
# drop the 'redirect' flag for redirect without URL change (internal rewrite)
}
}
# stop hotlink loop
location = /static/images/hotlink-denied.jpg { }

Apache (goes in .htaccess file)

RewriteEngine on
RewriteCond %{HTTP_REFERER} !^$
RewriteCond %{HTTP_REFERER} !^http(s)?://(www\.)?yourdomain.com [NC]
RewriteCond %{HTTP_REFERER} !^http(s)?://(www\.)?google.com [NC]
RewriteCond %{HTTP_REFERER} !^http(s)?://(www\.)?bing.com [NC]
RewriteCond %{HTTP_REFERER} !^http(s)?://(www\.)?yahoo.com [NC]
RewriteRule \.(jpg|jpeg|png|gif|svg)$ http://dropbox.com/hotlink-placeholder.jpg [NC,R,L]


Disable CORS/Strengthen HTTP access control

The above steps will help prevent others from linking to static files on your site. However, you’ll also want to either disable CORS (Cross Origin Resource Sharing), or strengthen your HTTP access control for your site.

CORS is the ability for other sites to reference links to your own site in their source code. By disabling this, you’re preventing other sites from displaying content hosted on your own site. You can be selective with CORS as well, to only allow references to your own CDN URL, or another one of your sites. Or you can disable it entirely if you prefer.

According to OWASP guidelines, CORS headers allowing everything (*) should only be present on files or pages available to the public. To restrict the sharing policy to only your site, try using these methods:

.htaccess (Apache):

Access-Control-Allow-Origin: http://www.example.com

This allows only www.example.com to access your site. You can also set this to be a wildcard value, like in this example.

Nginx config (Nginx):

add_header 'Access-Control-Allow-Origin' 'www\.example\.com';

This says to only allow requests from www.example.com. You can also be more specific with these rules, to only allow specific methods from specific domains.

Disable iframes

Another step you may want to take is disabling the ability for others to create iframes from your site. By using iframes, some users may believe content on an attacker’s site is legitimately from your site, and be misled into sharing personal information or downloading malware. Read more about X-Frame-Options on Mozilla’s developer page.

Use “SAMEORIGIN” if you wish to embed iframes on your own site, but don’t want any other sites to display content. And use “DENY” if you don’t use iframes on your own site, and don’t want anyone else to use iframes from your site.

Block IP addresses

Last, if you’ve discovered that another site is actively mirroring your own, you can also block the site’s IP address. This can be done with either Nginx or Apache. First, find the site’s IP address using the following:

dig +short baddomain.com

This will print out the IP address that the domain is resolving to. Make sure this is the IP address that shows in your site’s Nginx or Apache access logs for the mirrored site’s requests.

Next, put one of the following in place:

Apache (in .htaccess file):

Deny from 123.123.123.123

Nginx (in Nginx config):

deny 123.123.123.123;


File a DMCA Takedown Notice

Last, if someone is mirroring your site without your explicit approval or consent, you may also want to take action by filing a DMCA Takedown Notice. You can follow this DMCA guide for more information. The guide will walk you through finding the host of the domain mirroring your own site, and filing the notice with the proper group.


Thank you to Philip Jewell for collaborating on this article! And thanks for tuning in. If you have feedback, additional information about blocking mirrored sites drop a line in the comments or contact me.

  • « Previous Page
  • Page 1
  • Page 2
  • Page 3
  • Page 4
  • Page 5
  • Page 6
  • …
  • Page 8
  • Next Page »

Footer

Categories

  • Ansible
  • AWS
  • Git
  • Linux
  • Optimization
  • Performance
  • PHP
  • Scalability
  • Security
  • Uncategorized
  • WordPress

Copyright © 2025 · Atmosphere Pro on Genesis Framework · WordPress · Log in